
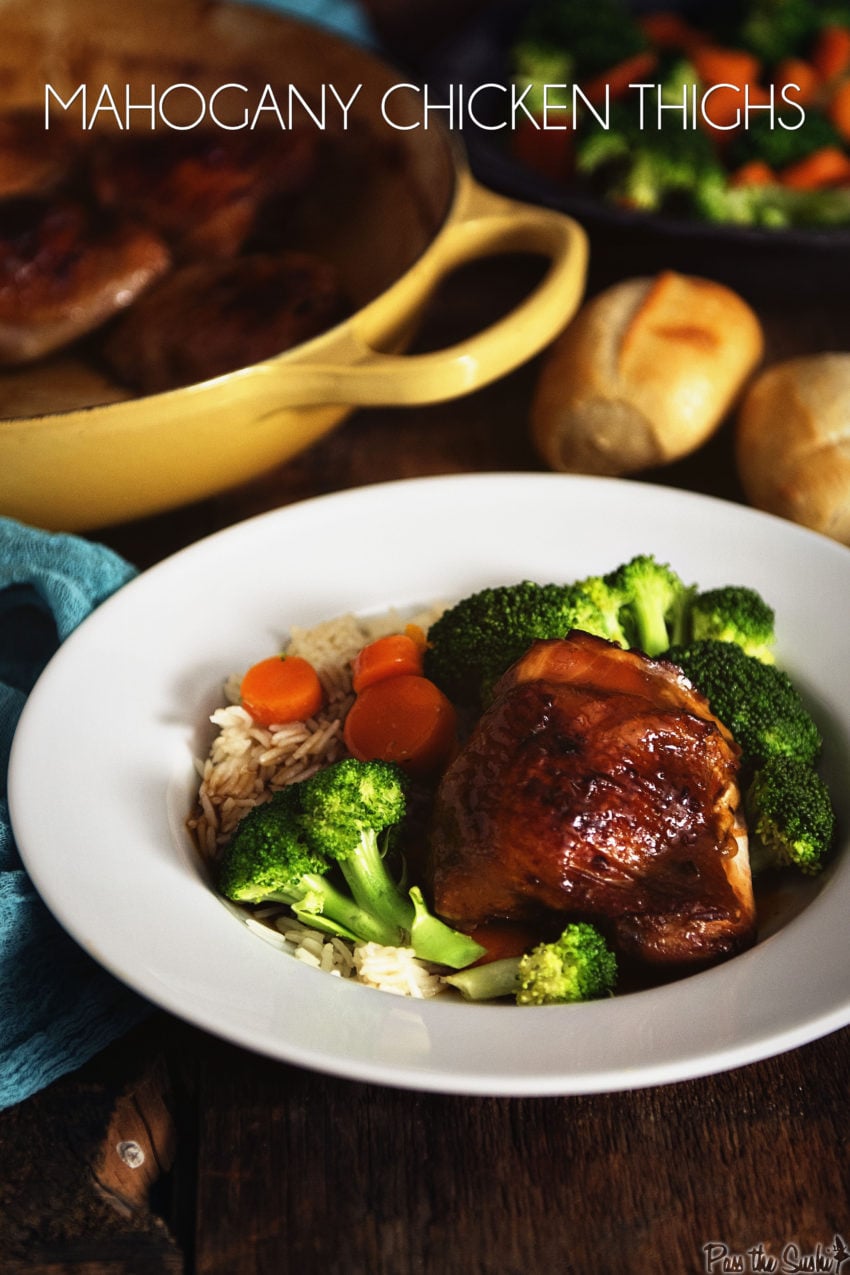
Deep reddish brown, glossy enough to catch the light, with skin that crackles under your fork and a sticky glaze clinging to every edge. That color is where mahogany chicken thighs get their name, and you paint it on yourself, a thin coat at a time, during the last fifteen minutes in the oven.

You get the sweet, salty soy, honey and molasses flavor of old-school mahogany wings, with a splash of black vinegar so it never turns cloying, minus the cup of soy sauce older recipes simmer the chicken in. The glaze reduces in its own small pot, so the skin stays crisp, and bone-in thighs are built for this, staying juicy all the way to 185°F, right where the meat goes tender and the glaze goes tacky. The grill method below gets you the same lacquer outside.
🔪 Ingredients for mahogany chicken thighs
For the chicken:
- Bone-in, skin-on chicken thighs: about 3 pounds, 8 thighs close in size so they finish together
- Kosher salt
- Chinese five-spice powder
- White pepper
For the glaze:
- Low-sodium soy sauce: regular soy gets too salty once the glaze reduces
- Shaoxing wine: dry sherry works too
- Honey
- Molasses: regular, not blackstrap, which turns bitter as it reduces
- Chinkiang black vinegar: rice vinegar in a pinch
- Fresh ginger: finely grated
- Garlic: finely grated
- Toasted sesame oil
- Red pepper flakes: optional
To finish:
- Scallions: thinly sliced
- Toasted sesame seeds
Equipment
- Rimmed sheet pan with a wire rack that fits inside it
- Foil to line the pan
- Small saucepan
- Pastry or silicone brush
- Instant-read thermometer (our meat temperature guide has every target in one place)
- A grill, if you’re cooking outside

📝 How to make mahogany chicken thighs
In the oven
- Dry brine the thighs. Pat them dry, mix the salt, five-spice and white pepper, and season all over. Set them skin up on the rack over a foil-lined sheet pan and refrigerate uncovered for 4 to 24 hours. Cold fridge air dries the skin, and dry skin is what crisps and gives the glaze something to grab.
- Reduce the glaze. Simmer the soy, Shaoxing, honey, molasses, black vinegar, ginger, garlic and pepper flakes over medium heat, stirring, for 6 to 8 minutes, until it’s reduced by about half and coats a spoon. Stir in the sesame oil. It thickens more as it cools. Pour half into a small bowl for serving and brush only from the other half.
- Roast. Heat the oven to 425°F with a rack in the middle. Roast the thighs skin up on the wire rack for about 30 minutes, until the skin is golden and rendered and the thickest part reads about 165°F.
- Lacquer. Brush on a thin coat of glaze and roast 5 minutes. Repeat twice more, three coats in all. If the color wants a push, broil for 1 to 2 minutes and stay at the oven door. Pull at 185°F in the thickest part, away from the bone.
- Finish. Rest 5 minutes, then scatter scallions and sesame seeds over the top. Warm the reserved glaze and serve it on the side.
On the grill
Set up a two-zone fire with the cool side running around 375°F to 400°F. Grill the dry-brined thighs skin up on the cool side with the lid down for 30 to 35 minutes, until they reach about 165°F. Brush on three thin coats over the next 15 minutes, closing the lid between each one. Finish skin side down over the hot side for 30 to 60 seconds, just until the glaze bubbles and sets. Honey and molasses scorch fast over direct heat, so don’t walk away. Pull at 185°F.
🔄 Substitutions
- Boneless thighs: start glazing after about 15 minutes in the oven, since they reach 185°F much sooner. Without skin, the glaze sits on the meat as a sticky coating instead of a crackly one.
- Drumsticks: same method; roast about 35 to 40 minutes before the first coat.
- Dry sherry for Shaoxing wine: swap one for one. The glaze comes out a little sweeter and less savory.
- Rice vinegar for black vinegar: the glaze tastes brighter and sharper, without the malty, smoky edge.
- Reduced-sodium tamari for soy sauce: makes it gluten-free if the label says so, and the glaze reduces slightly darker and thicker.
- Brown sugar for honey: the same sweetness, but the glaze dries more matte than glossy.
💡 Meat nerd tips
- Buy thighs that match in size. A small thigh and a big one will never hit 185°F at the same time.
- Thin coats beat one thick one. A heavy coat slides off and scorches on the pan; three thin ones dry into the lacquer.
- Keep the serving half of the glaze clean and separate, and brush only from the other bowl.
- Don’t cover the thighs in the fridge. Wet skin steams instead of crisping, and the glaze slides right off it.
🍽️ What to serve with mahogany chicken thighs
- Steamed jasmine rice, with the reserved glaze spooned over the rice, since the chicken already wears plenty.
- Smashed cucumber salad, cold and garlicky with enough vinegar to cut the sticky glaze.
- Garlic bok choy or charred broccolini, anything green that can catch the drips on the plate.
- Lettuce cups with the leftover meat pulled off the bone the next day.
🧊 Leftovers and storage
- Refrigerate cooled thighs in an airtight container for 3 to 4 days.
- Keep any extra glaze in a jar in the fridge for up to a week.
- Reheat on a rack at 375°F for 12 to 15 minutes so the skin crisps back up. The microwave turns the skin soft.
- Freeze cooked thighs for up to 3 months and thaw overnight in the fridge before reheating.
Where this recipe started
We first made these thighs from a Cook’s Illustrated recipe (America’s Test Kitchen’s magazine, September/October 2014), braised low and slow in soy sauce. This version keeps the deep soy and molasses flavor and changes how we get there:
- Dry brine first. Salt, five-spice and white pepper sit on the thighs for 4 to 24 hours in place of the long simmer in soy sauce.
- Hot oven, crisp skin. The thighs roast skin up on a rack at 425°F instead of braising skin down at 300°F.
- Glaze on the side. Low-sodium soy, honey, molasses, Shaoxing wine and black vinegar reduce in their own small pot, so there’s no straining, skimming or cornstarch.
- Less soy. A third of a cup of low-sodium soy sauce replaces a full cup of regular.
- Three thin coats. Brushed on over the last 15 minutes, with the thighs pulled at 185°F instead of 195°F.
- A grill method. The same lacquer over a two-zone fire.
Mahogany Chicken Thighs

Recommended Equipment
- Rimmed sheet pan with wire rack
- Small saucepan
- Pastry or silicone brush
Ingredients
Chicken
- 8 bone-in, skin-on chicken thighs about 3 pounds
- 1 1/2 teaspoons kosher salt
- 1/2 teaspoon Chinese five-spice powder
- 1/4 teaspoon white pepper
Glaze
- 1/3 cup low-sodium soy sauce
- 1/4 cup Shaoxing wine or dry sherry
- 3 tablespoons honey
- 2 tablespoons molasses not blackstrap
- 1 tablespoon Chinkiang black vinegar or rice vinegar
- 1 tablespoon fresh ginger finely grated
- 4 garlic cloves finely grated
- 1 teaspoon toasted sesame oil
- 1 pinch red pepper flakes optional
To finish
- 2 scallions thinly sliced
- 1 teaspoon toasted sesame seeds
Instructions
Dry brine the chicken
- Pat the thighs dry. Mix the salt, five-spice and white pepper and season the thighs all over.
- Set them skin up on a wire rack over a foil-lined rimmed sheet pan. Refrigerate uncovered for 4 to 24 hours.
Make the glaze
- In a small saucepan, combine the soy sauce, Shaoxing wine, honey, molasses, black vinegar, ginger, garlic and red pepper flakes. Simmer over medium heat, stirring, for 6 to 8 minutes, until reduced by about half and thick enough to coat a spoon.
- Stir in the sesame oil. Pour half into a small serving bowl and set aside. Use the other half for brushing.
Roast
- Heat the oven to 425°F with a rack in the middle.
- Roast the thighs skin up on the wire rack for about 30 minutes, until the skin is golden and the thickest part reads about 165°F.
Lacquer and finish
- Brush the thighs with a thin coat of glaze and roast 5 minutes. Repeat twice more for three coats total.
- If you want deeper color, broil for 1 to 2 minutes, watching closely. Pull when the thickest part reads 185°F away from the bone.
- Rest 5 minutes. Top with scallions and sesame seeds and serve with the warmed reserved glaze.
Grill method (optional)
- Set up a two-zone fire, with the indirect side around 375°F to 400°F. Grill the dry-brined thighs skin up over indirect heat, lid down, for 30 to 35 minutes, to about 165°F.
- Brush on three thin coats over the next 15 minutes, closing the lid between coats. Finish skin side down over direct heat for 30 to 60 seconds, just until the glaze bubbles and sets. Pull at 185°F.
Notes
- Use low-sodium soy sauce. Reducing the glaze concentrates the salt, and regular soy makes it harsh.
- Keep the serving half of the glaze separate and brush only from the other half.
- Line the pan with foil. Dripped glaze burns onto the pan at 425°F.
- Thin coats are the trick. A thick coat slides off and scorches.
- Boneless thighs reach 185°F much sooner; start glazing after about 15 minutes.
- The glaze keeps in the fridge for up to a week. Warm it before brushing.
Save this Recipe
Nutrition
Bookmark this recipe now!
Quick summary
Mahogany chicken thighs are bone-in, skin-on thighs dry-brined with salt and five-spice, roasted on a rack at 425°F until the skin renders, then brushed with three thin coats of a reduced soy, honey, molasses and black vinegar glaze. They come out of the oven at 185°F, glossy and crackly. The same glaze and timing work on a two-zone grill.
❓ FAQs
The name comes from the color. Soy, molasses and honey caramelize on the skin into a glossy, deep reddish brown that looks like polished wood.
Chicken is safe at 165°F, and we take bone-in thighs to 185°F because the meat is more tender there. Our meat temperature guide lists every target.
Yes. Reduce it up to a week ahead and keep it in the fridge. Warm it for a minute so it brushes on thin.
You can, but cut it to 1/4 cup. Reducing the glaze concentrates the salt, and full-sodium soy gets harsh fast.
Yes. Cook them skin up over indirect heat to about 165°F, glaze over the last 15 minutes, and set the glaze with a quick pass over direct heat. The full grill method is above.
Keep reading:













Chicken perfectly cooked but finished sauce was incredibly salty. Good flavor though.
The mahogany chicken thighs is really good! I have used it two times. You are right that it seems long, but it takes hardly any time from beginning to end.
It is a wonderful way to use the lower-cost part of the chicken, very tasty.
Thank you!