Fresh Ground Beef: How to Grind for Perfect Patties! The ultimate guide to grinding your own beef for burgers. This is a foolproof method for perfect burger patties every time.
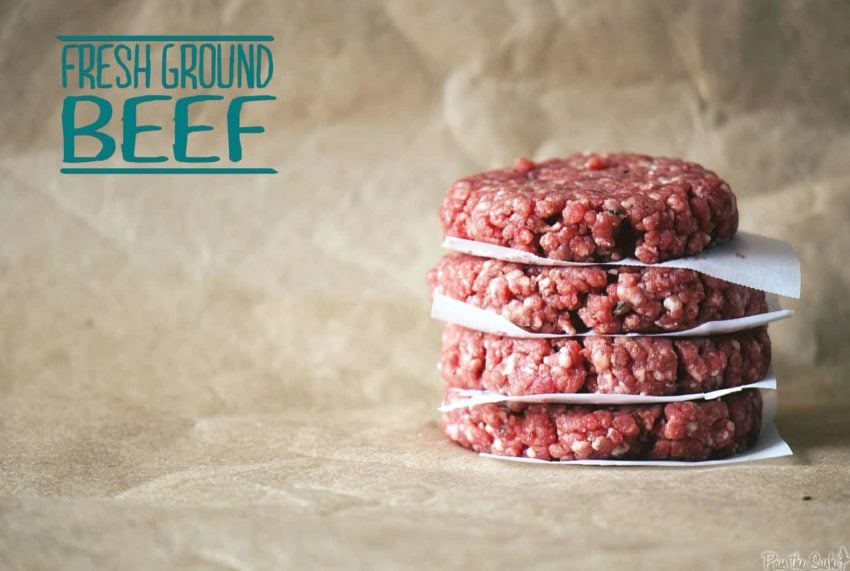
Why grind your own beef for burgers you ask? Well, 1) it’s cheaper! 2) it’s fresher. 3) it’s more customizable! It’s also a great way to use any trimmings you have saved up through the year for the juiciest burgers. Besides, homemade hamburger patties are just that much better!
Grinding your own meat allows you to control the fat content and the seasonings in your delicious burger recipe so you can make it just how you like it. I like to make an afternoon out of seasoning and grinding large batches of beef for various meals so I can freeze in perfect portions. Then all I need to do is thaw when I’m ready to go!
Sure, it’s a little hands-on and a little bit messy, but that’s what Girl Carnivore is all about. Rolling up the sleeves and getting down and dirty. (Just wait till we get to sausage making.)
Ingredients Needed
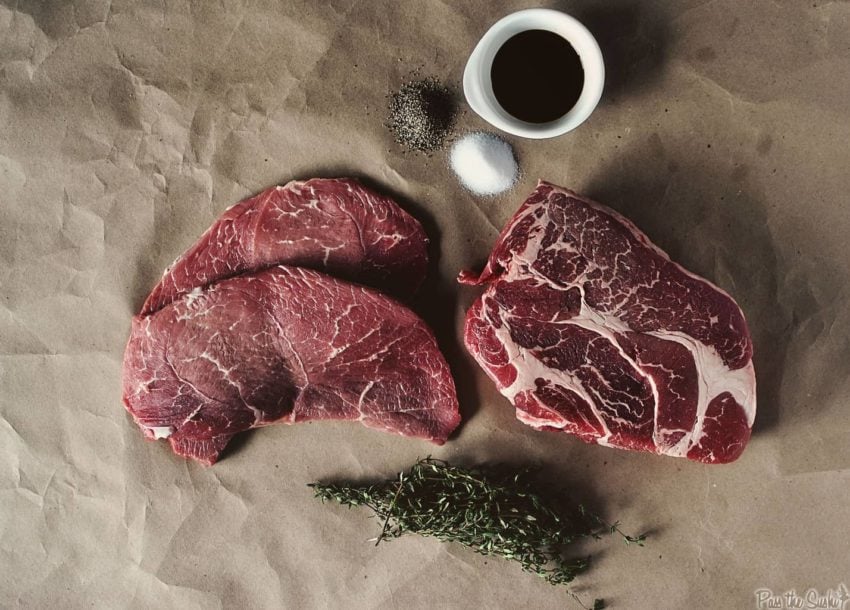
- Beef – we’re using a combination of boneless chuck roast and boneless sirloin to make the ground beef, which I think creates the best flavor and texture.
- Salt and Ground Pepper – or any other seasoning you like.
- Worcestershire Sauce – adds a bit of saltiness to the meat for better flavor.
- Thyme Sprigs – gives the beef a touch of earthy freshness.
What Meat to Use
What is the best meat to grind for burgers? For me, it’s a mix of well-marbled chuck and sirloin.
What meat you use depends on the fat ratio you are trying to get in your homemade burgers. I like my burgers to be on the fattier side, because, as I say, fat equals flavor. So, I use a combination of chuck roast and sirloin and aim for a 30% fat ratio.
Chuck roast grinds well and has a decent fat content balance of 85/15. Sirloin, especially top sirloin, has a lot of flavors and lower fat content. It’s also a great way to stretch out batches of ground beef for good value.
If you’re really wanting to jazz things up add bacon or pork fat for extra flavor and moistness when cooking the beef patties.
Here’s a quick rundown on cuts of beef you should (and shouldn’t) use to make ground beef for burgers:
- Brisket: comes from the lower part of the neck or chest. Brisket can be decently marbled and works great for a coarser grind, like the one you might use for chili. For burger meat, I make sure to get rid of the thick fat cap or soft squishy fat before grinding.
- Shank: comes from the lower end of the leg. This one is not ideal for grinding, since it tends to be more bone than meat.
- Rib: rib meat has great fat content, so it works great for burger patties, it’s just a bit on the pricy side.
- Plate: comes from the lower midsection of the cow. Plate cuts have a higher fat content (75/25), so they work great for burgers.
- Short Loin: if the word “loin” is involved, then you can expect tons of flavor but a leaner cut. Always mix in a little more fat when using these cuts.
- Flank: comes from the lower end of the belly. Flank is juicy and flavorful and works great for grinding. Flank cuts include London Broil, flank steak, and skirt steak. Flank is the happy place between affordable, decent fat content, and flavorful meat. However, you may need to add more fat to the meat mixture.
- Round: comes from the hindquarter of the cow. Round beef is big and lean and great for grinding. However, you will need to add fat unless you like really lean burgers. But really, add some fat.
Just remember the leaner your grind, the dryer the burger. If you go for a lean blend, make sure to add Worcestershire and other bold flavor-boosting options when you make your hamburger patties.
How to Make Ground Beef for Burgers
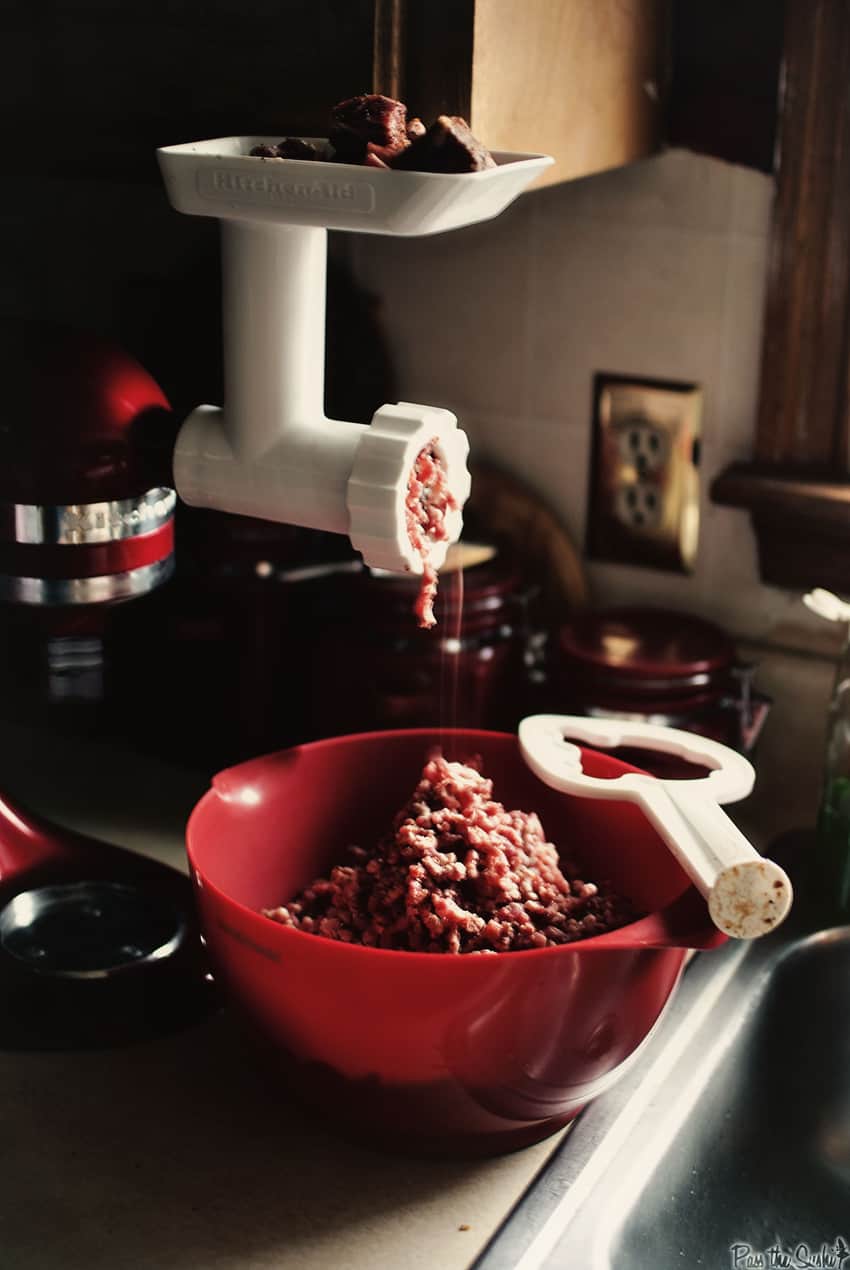
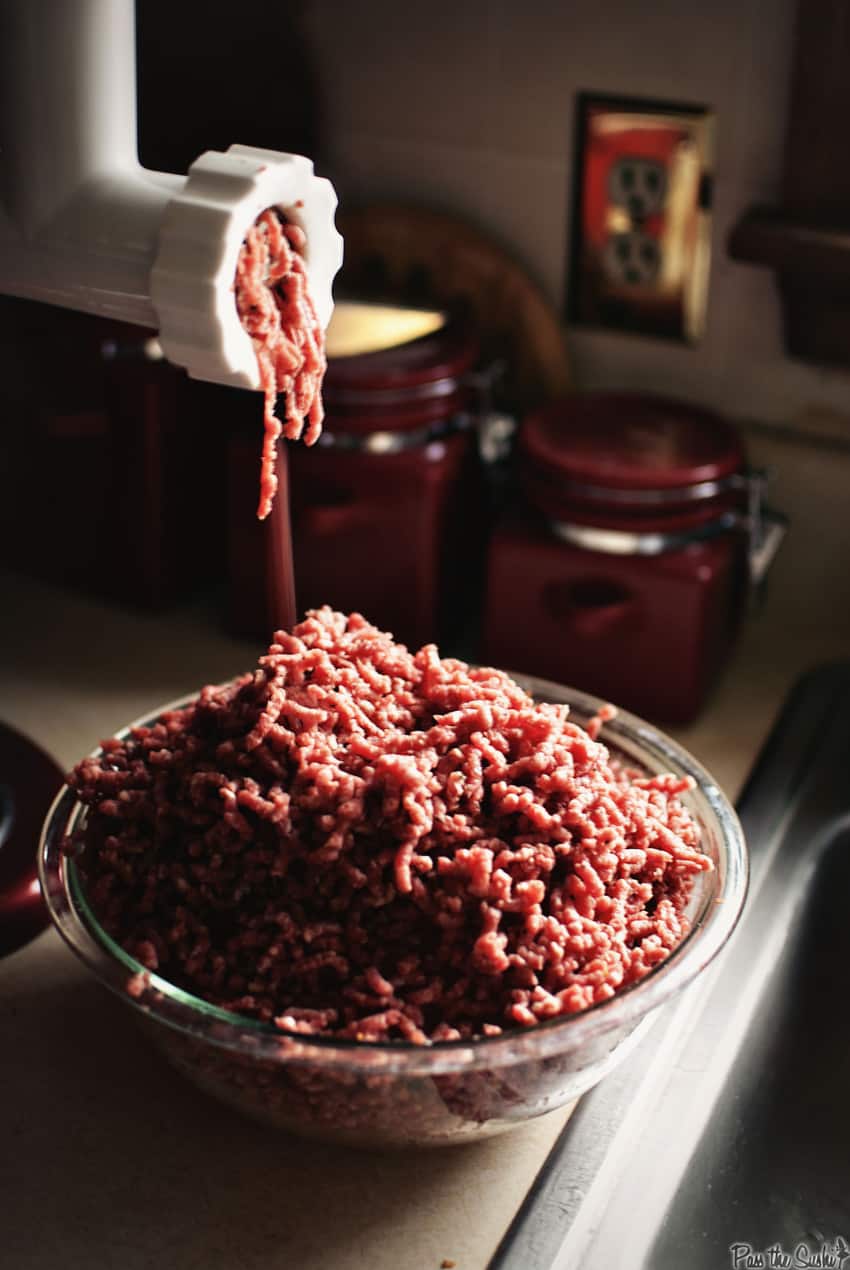
First, place the meat grinder attachment in the freezer.
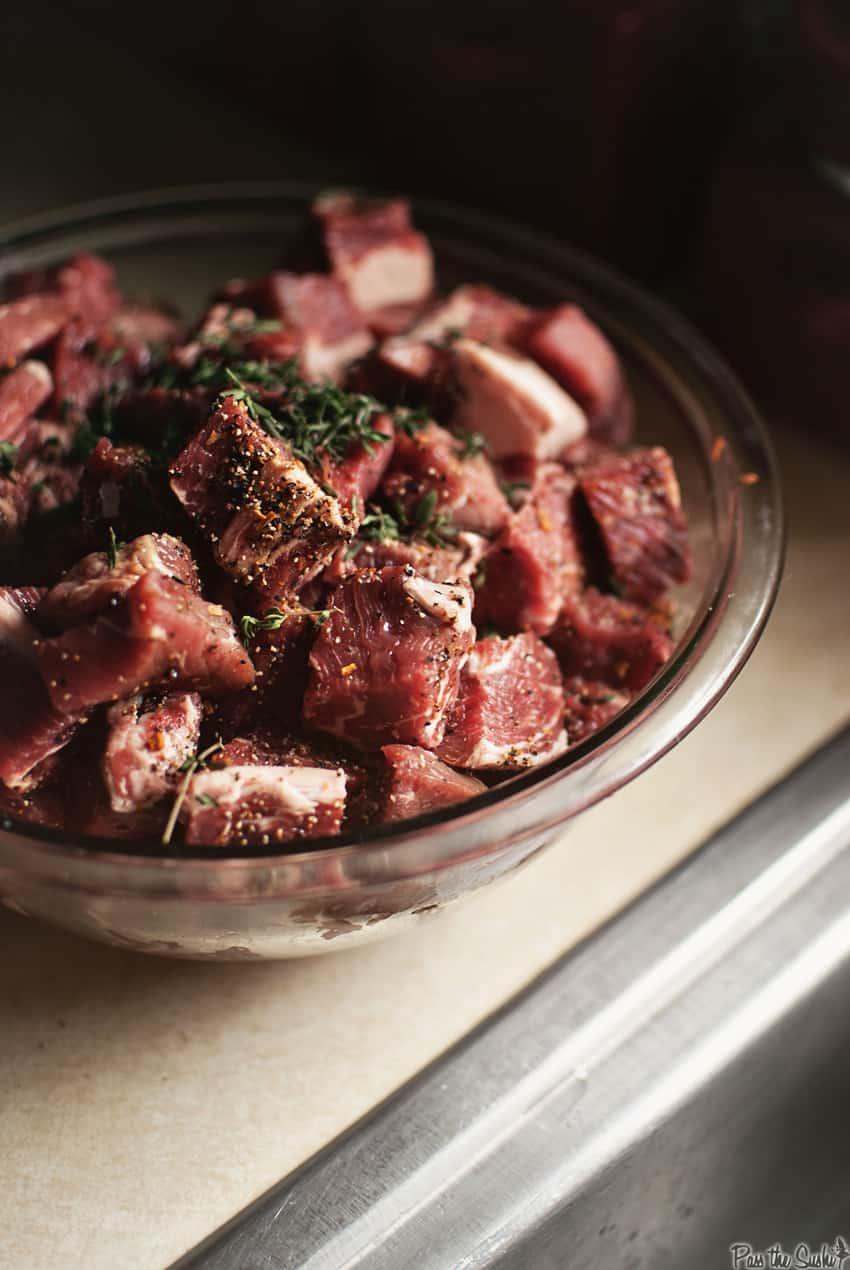
Cut the meat into 1” cubes, then place in a bowl with salt, pepper, Worcestershire, and thyme. Stir to coat, then place in the freezer for 20 minutes.
When you’re ready to grind, push the meat through the feed tube into the meat grinder. Grind through the coarse setting once, then change out the grinding plate to the fine coarse one. Grind again.
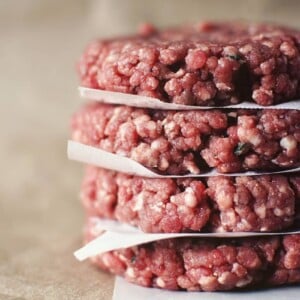
Gently form the meat into patties and place them in an airtight container with wax paper between them. Loosely cover and refrigerate until you’re ready to use them.
Do You Add Egg to Ground Beef for Burgers?
Nope. It’s not necessary. In fact, I recommend against adding egg to the fresh ground beef for burger patties.
There’s plenty of moisture and fat in the beef to hold the patties together. Adding egg requires you to mix the meat. Overworked meat can become dry, tough, and less flavorful. I don’t even use egg in my smoked meatloaf!
How Do You keep Ground Beef Burgers from Falling Apart?
There are a couple of things you can do to make sure your burger patties are able to hold their shape before you cook them.
- Use the right meat. You want to use beef with decent fat content. If it’s too lean, the patties can be dry and crumbly.
- Keep them cold. The colder patties are much more likely to hold their shape without falling part.
- Don’t over-handle. While your mixing, forming, and handling the burger patties, do so minimally and gently. Over-worked meat becomes crumbly.
- Chill the patties after forming. This helps them hold up better when tossed on the grill.
Tips and Notes for Fresh Burger Patties
- Keep everything very cold. Place the grinder attachment and the meat in the freezer for 20 minutes before grinding. As the meat warms, so does the fat and this can make things messy. The colder the better!
- Run it through twice. You’ll run the meat first for a coarser grind, then switch the attachment out for a finer one. This creates the perfect consistency!
- Don’t push too hard when feeding the meat through the tube or you’ll be wiping ground beef splatter off of your fridge.
- Work in batches. If you are using a home grinder, a KitchenAid, or anything short of a full-on butcher counter grinder, you are going to work the machine…and yourself. Divide things and work in batches. You’ll thank me later.
- Play with seasonings. The bonus to working in batches is that you can also think about how you want to use the meat. Try taco seasoning in one batch, burger blend in another, etc., etc. Garlic powder, onion powder, and dried herbs are easy things to mix in. Just make sure you never over season as when you form the burgers you should salt season the outside before grilling.
- When done grinding, run a few slices of white bread through the grinder. This helps get out a lot of the build-up before you start the deep clean.
How to Store
To store fresh burger patties in the fridge, place the patties into a container with wax paper between them. Loosely cover and refrigerate for 1-2 days at most.
To store fresh burger patties in the freezer, place the patties in a single layer on a baking sheet lined with wax paper. Set them in the freezer until hardened, then transfer to an airtight container and store in the freezer for up to 4 months or use a vacuum sealer to prevent any freezer burn.
When you’re ready to cook, thaw in the fridge if frozen, then cook as desired.
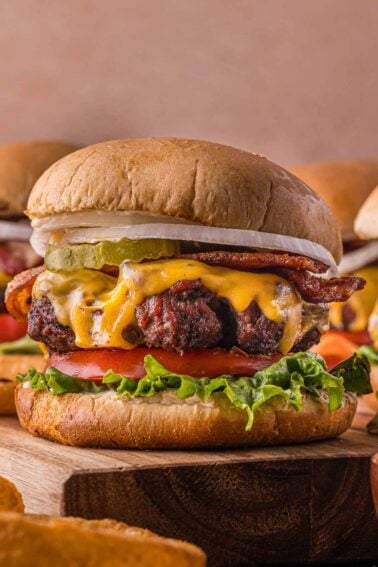
Must try Burger Recipes
Now that you’ve mastered grinding your own beef, it’s time to step up your burger game! Here are a few of my favorite burger recipes:

Sauces, Mops, & Condiments
Homemade Big Mac Sauce
Ground Beef
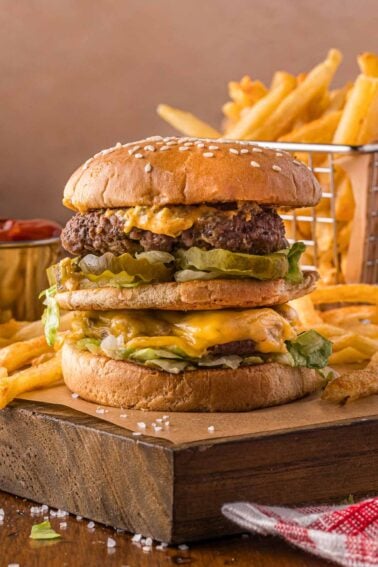
Classic Bacon Cheeseburger
Beef Recipes
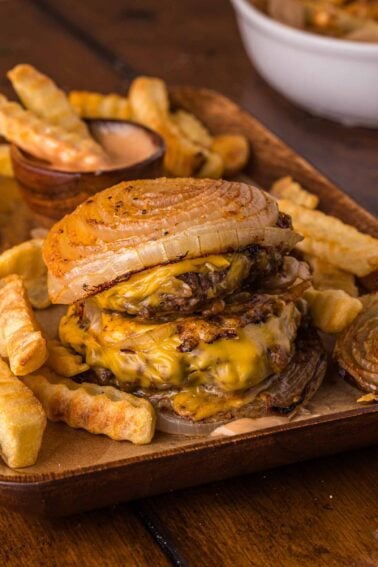
Flying Dutchman Burger
If you’ve tried my How to Grind Perfect Patties recipe, or any other recipe on GirlCarnivore.com please don’t forget to rate the recipe and let me know where you found it in the comments below. I get inspired by your feedback and comments! You can also FOLLOW ME on Instagram @girlcarnivore as well as on Twitter and Facebook.
How to Grind Perfect Patties
Ingredients
- 3 lbs boneless chuck roast with good marbling
- 2 lbs boneless sirloin
- 1 tsp salt
- 1/2 tsp ground pepper
- 1 tbsp Worcestershire sauce
- 1 tbsp thyme sprigs
Instructions
- Place meat grinder attachment in freezer.
- Meanwhile, cut the meat into 1″ cubes.
- Please in a bowl and toss with salt, pepper, Worcestershire sauce, and fresh thyme.
- Cover and place in freezer for 20 minutes.
- When ready, push meat through feed tube into meat grinder. Grind through coarse setting once.
- Change out the grinding plate to the fine coarse one and run through again being careful not to over handle the meat.
- Gently form the meat into patties, place wax paper between each, loosely cover, and refrigerate until ready for use.
Nutrition
Bookmark this recipe now!


Holy smokes!!!! I will forever be using this recipe. I was concerned it wouldn’t be cost effective but it was. For the same organic, grass fed beef at Sprouts it was $9.49/lb. Mine was $9.40/lb and so much better. I used fresh herbs from my garden and added maybe 1/4 t fresh rosemary. Thank you!
Rock out, Brittany! We’re stoked you enjoyed this. We do big batches and season ahead for future cooks – tacos, burgers, Italian meals, etc. Hope that this inspires you for some more ideas.
Great recipe!
One issue I had was when I tried to do the second grind using the fine plate the meat was getting all mushed up around fine plate and around the spiral feeder. (kitchen aid attachment)
Any suggestions how to prevent this form happening?
THANKS!
Hey hey Mark, how cold was the meat and the meat grinder when you tried this step? We live in a warm climate – and the moment things get warm things can get messy. We will keep all the pieces in the freezer (cleaned, of course), in between every step. And sometimes, will pause and put everything back in the freezer to reset.
Thanks!
I tried out the meat grinder attachment on my kitchen-aid for the first time this week. I added about 1/2 pound of corned beef into the mix and made some Irish themed burgers. So good! I’ll have to make grinding my own a habit.
So when do you pull the meat grinder attachment out of the freezer?
Silly instructions..
Hi Chris, You would remove the meat grinder from the freezer, and assembling if needed, moments before grinding the meat.
Before you grind the meat obviously..the attachment has to be cold as well as the meat otherwise it won’t really work
With this amount of meat about how many patties will you get?
My heart went pitter patter when I saw all that marbling.
This is so cool! I need the meat grinder attachment so I can try it this summer!
I received the meat grinder as a Valentine’s day gift a few years ago (seriously, true love right?!) and I have used it countless times since. Worth every penny.