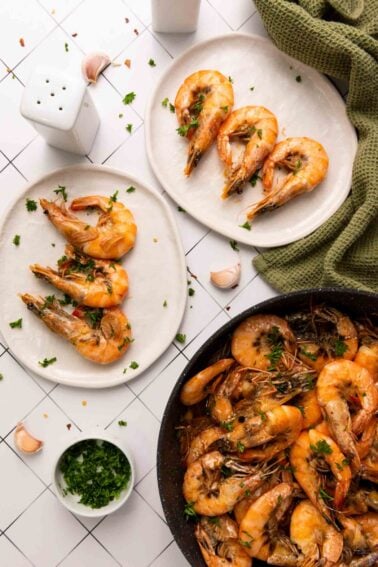
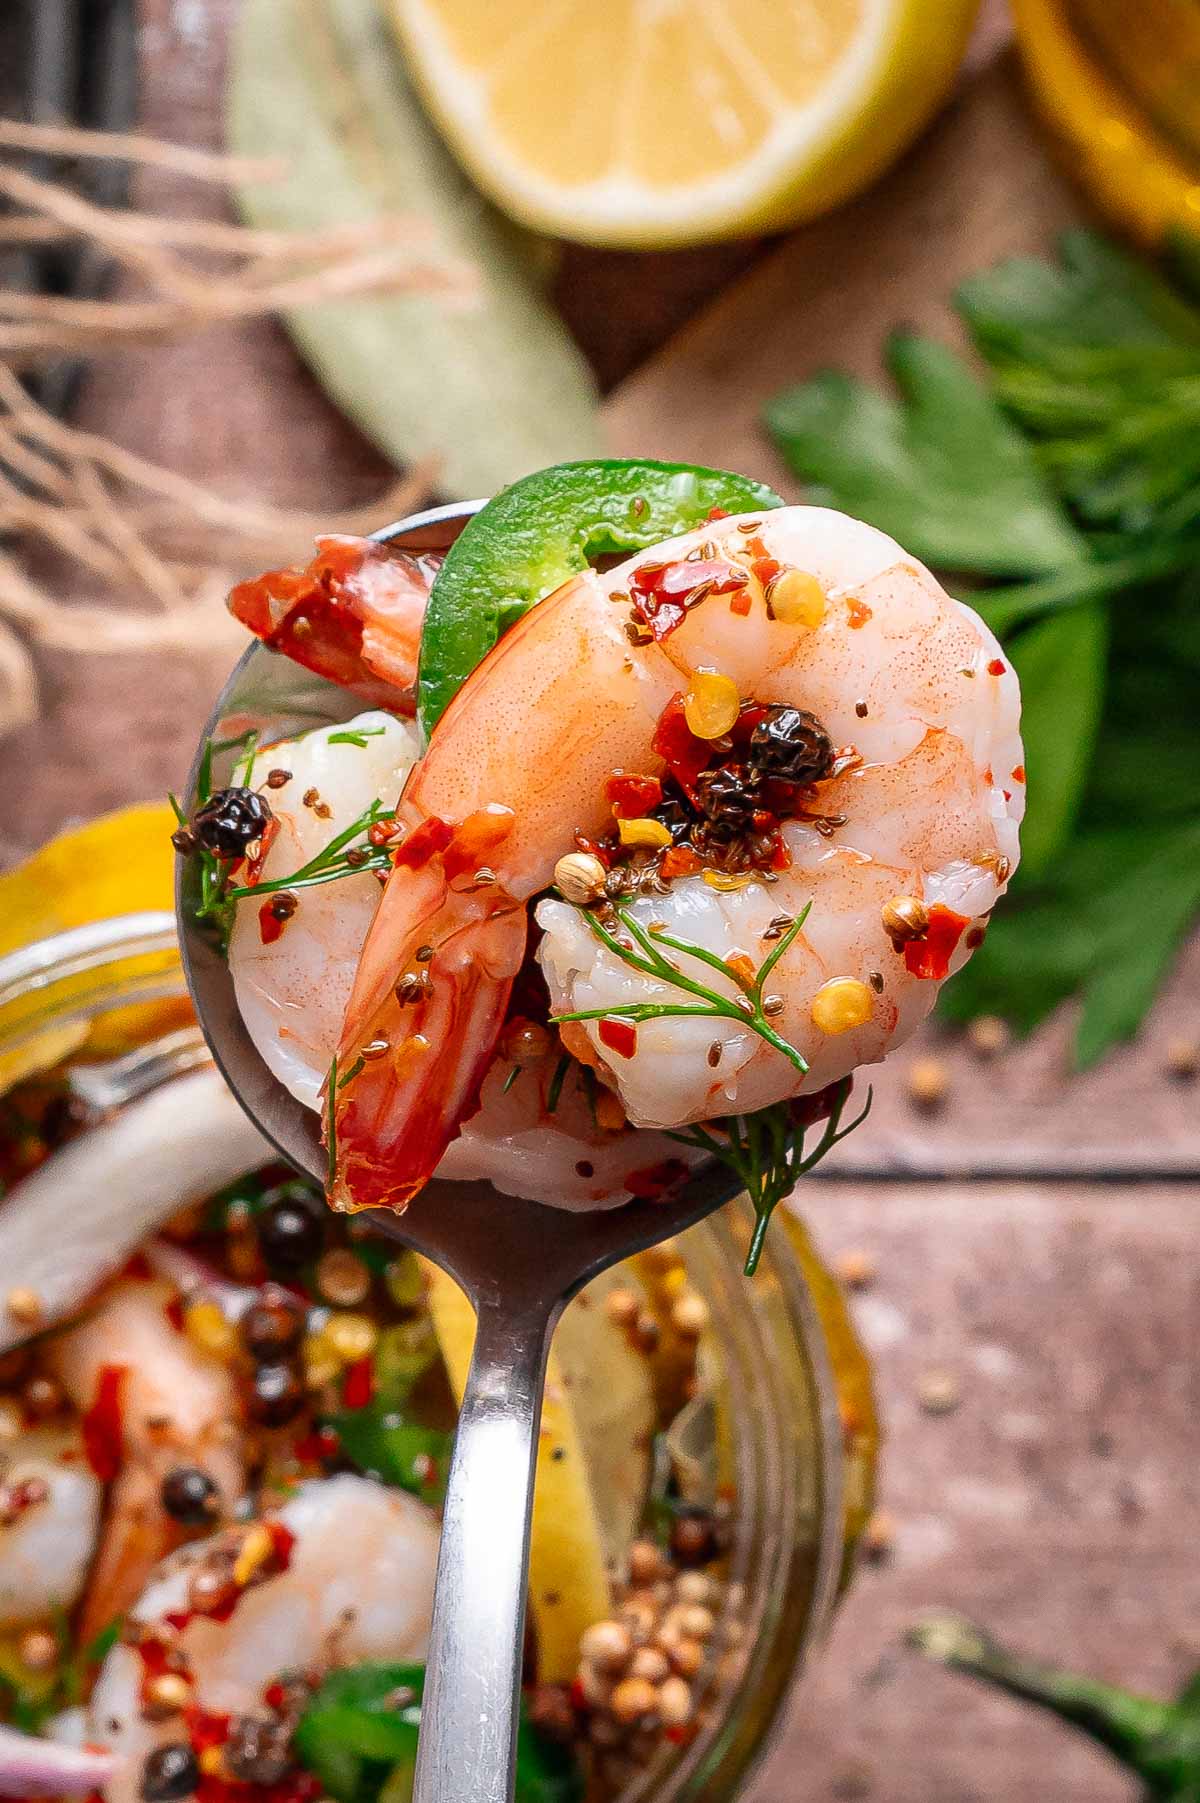
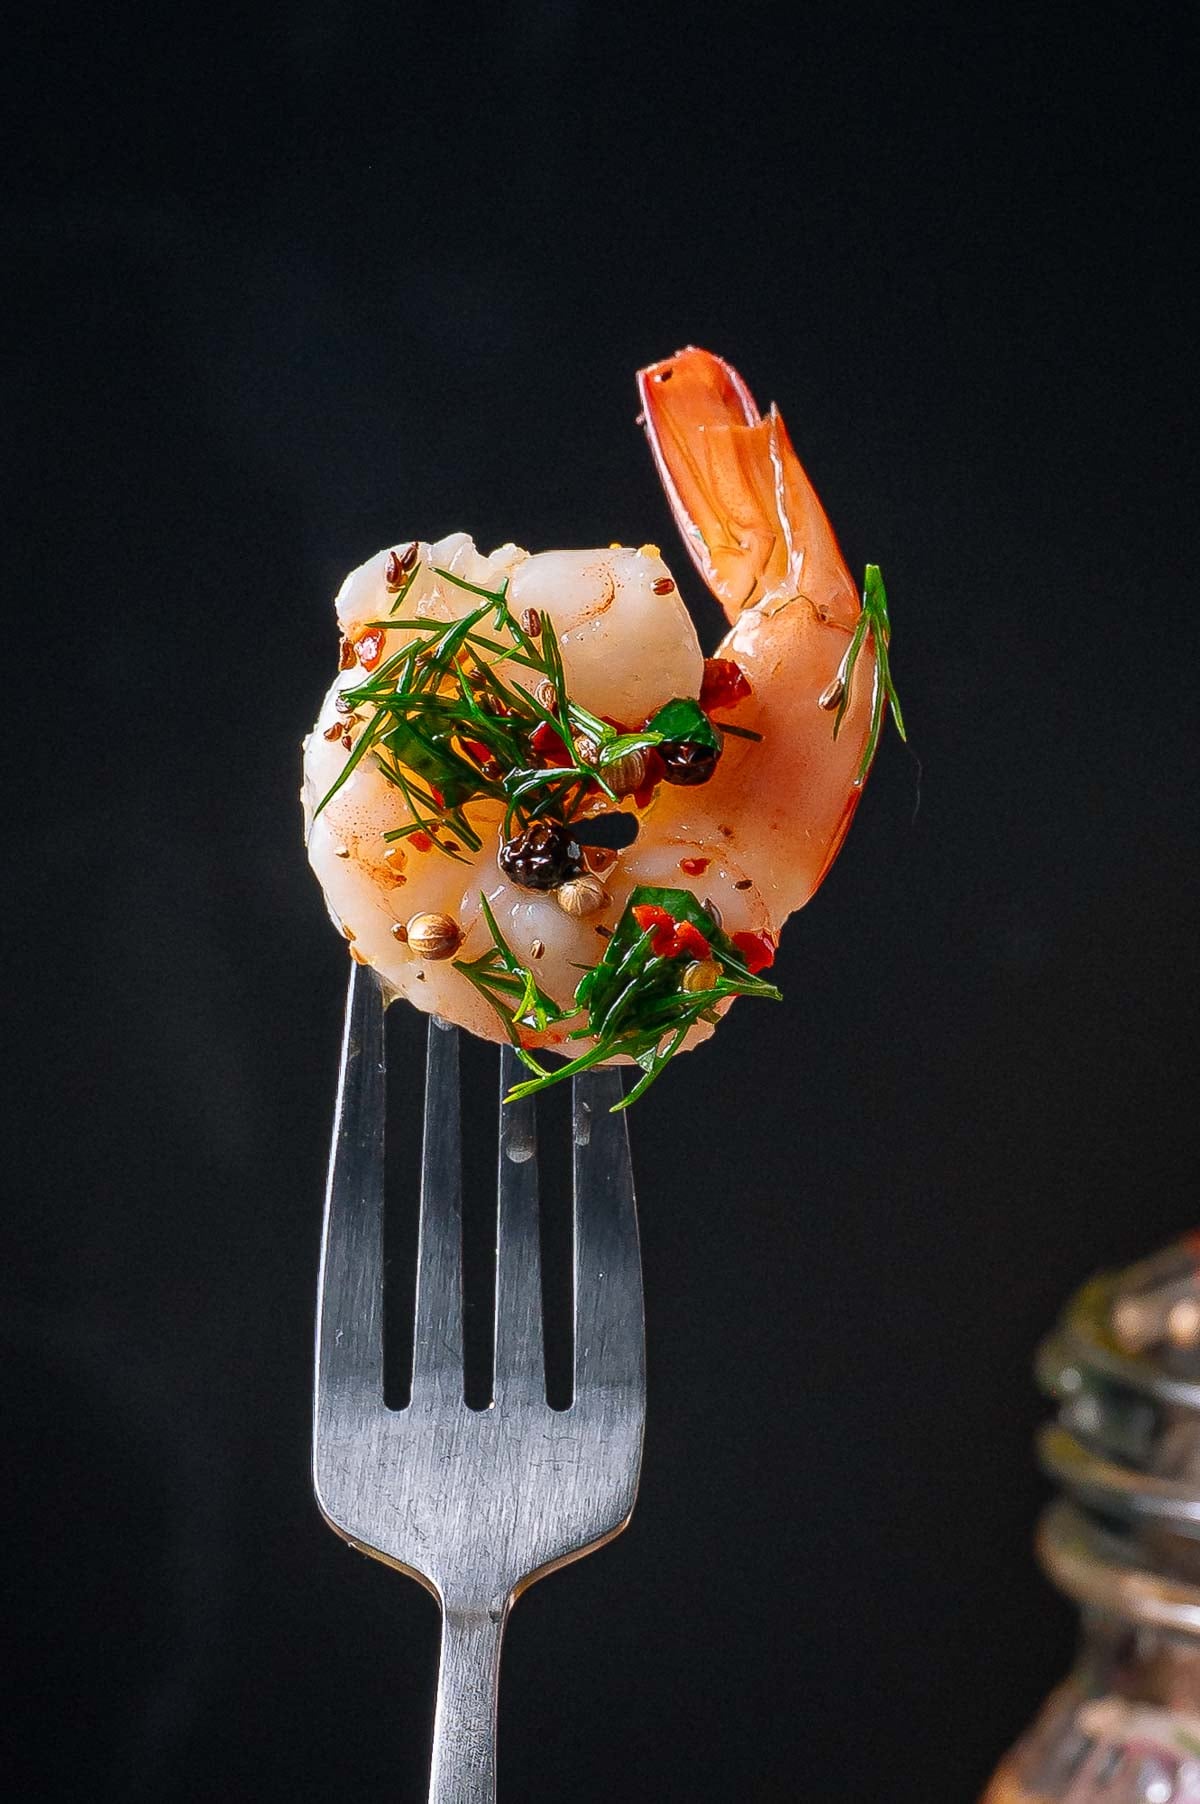
If you’re from the South, you may have heard of pickled shrimp. If you’re not, let us introduce you to this Low Country snack. Pickled shrimp remind us of pulling small shrimp off the Carolina coast on days so humid the air barely moved. They are cold, briny, and better than they should be for how little work actually goes into them. It’s a recipe that makes sense when it’s just too hot to cook.
You can whip these up for parties, holiday spreads, and honestly just because you’ve got a pound of cooked shrimp and want something to do with it other than cocktail sauce.
But here’s a little tip: pat the shrimp bone dry before they go in the jar. Pre-cooked shrimp hold water, and water is the enemy of a clean, punchy pickling liquid. Blot them well with paper towels and let them sit for a few minutes just to absorb as much of the liquid as you can before tossing them into the brine.
🔪 Ingredients for Pickled Shrimp
Nothing obscure here, but a few things are worth noting for your shopping cart:
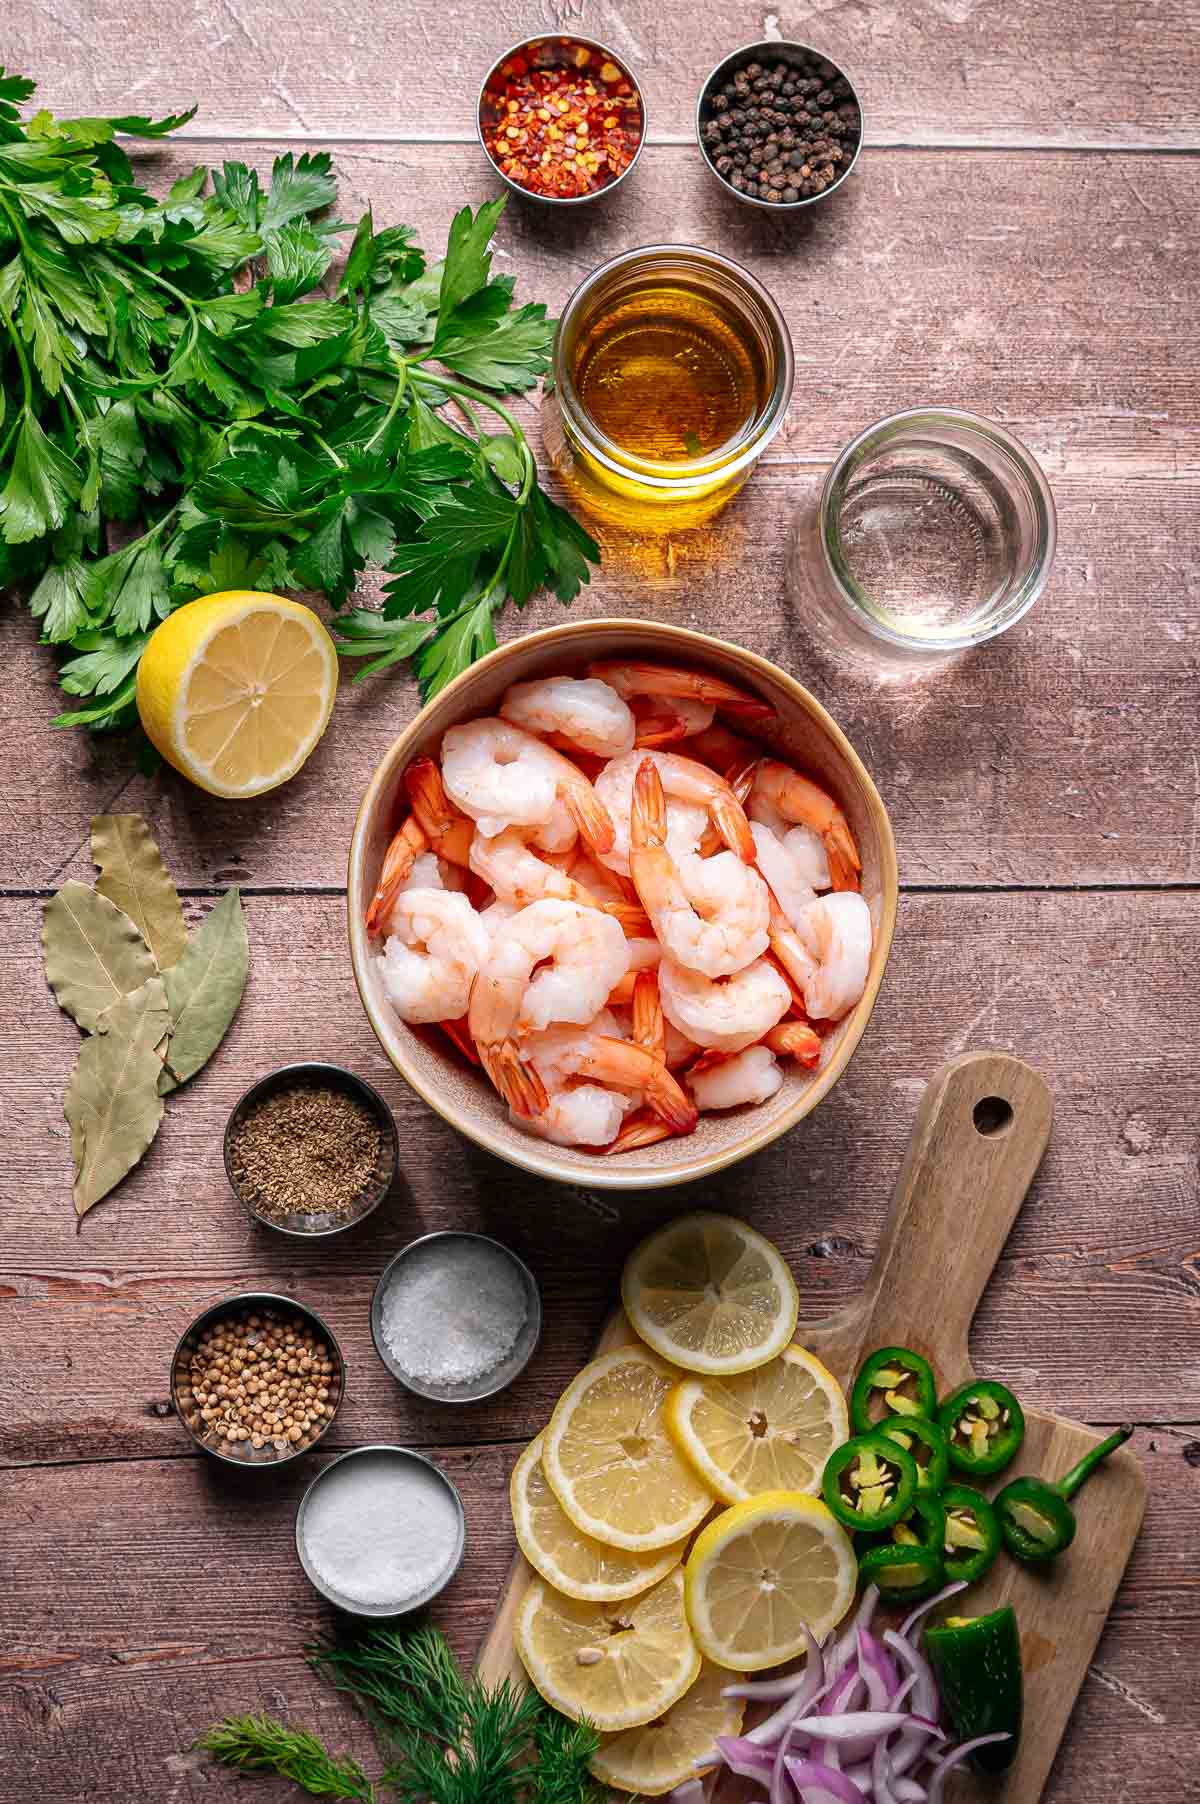
- Cooked large shrimp, peeled and deveined: Look for pre-cooked, 21/25 or 26/30 count. If you’re buying frozen, thaw completely and blot hard with paper towels before building the jar. Tail-on makes a prettier platter presentation; tail-off is easier to eat at a party.
- White wine vinegar
- Olive oil
- Lemon juice
- Granulated sugar: Just enough to balance the acid. Don’t skip it but you can use monkfruit sweetener if you’re keeping it Keto.
- Kosher salt
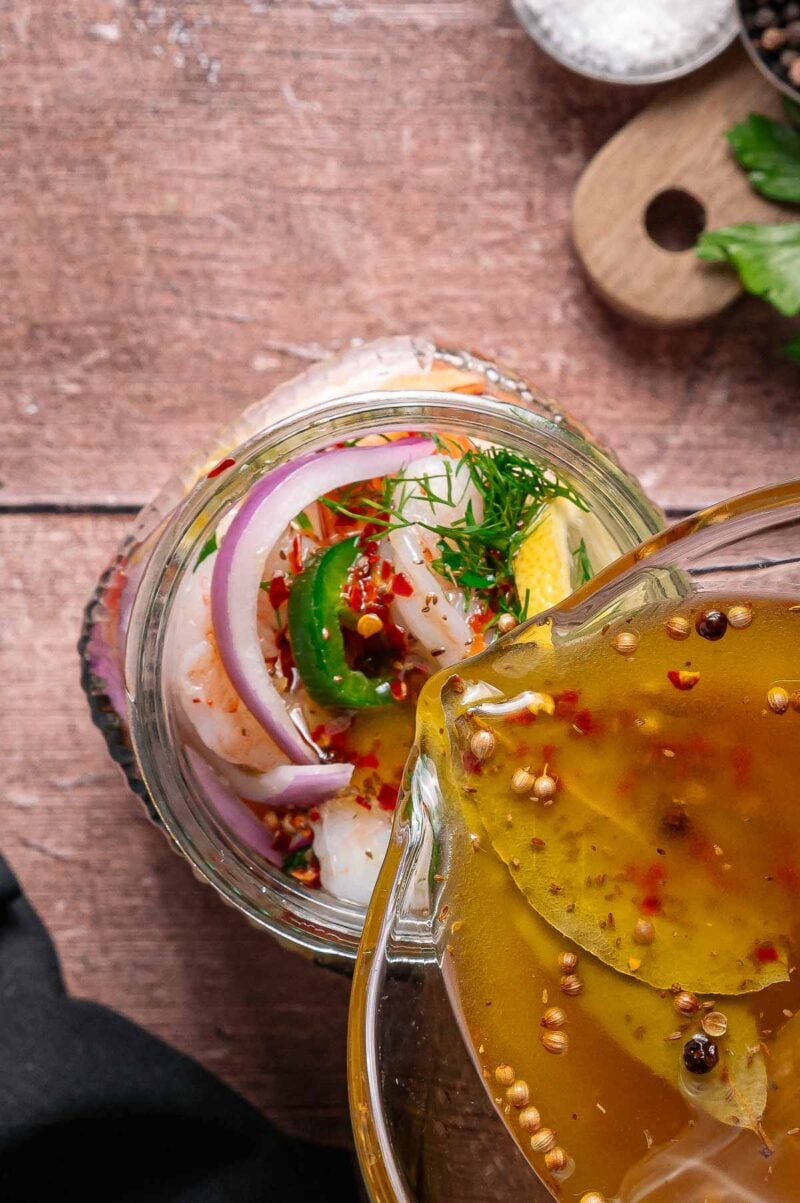
- Mustard seeds, celery seed, black peppercorns: These stay whole in the brine and slowly perfume the shrimp as they chill. Don’t grind them.
- Crushed red pepper flakes
- Bay leaves: Classic pickling aromatics. Three is right for this amount of shrimp.
- Serrano or jalapeño pepper, thinly sliced: Serrano if you want something sharper; jalapeño if you want to dial it back a little.
- Red onion, thinly sliced: Thin is key. It needs to soften and mellow in the brine, not stay crunchy and aggressive.
- Lemon, thinly sliced
- Fresh parsley and fresh dill: Both matter. Dill makes this taste like something. If you hate dill, double the parsley, but know what you’re giving up.
Equipment
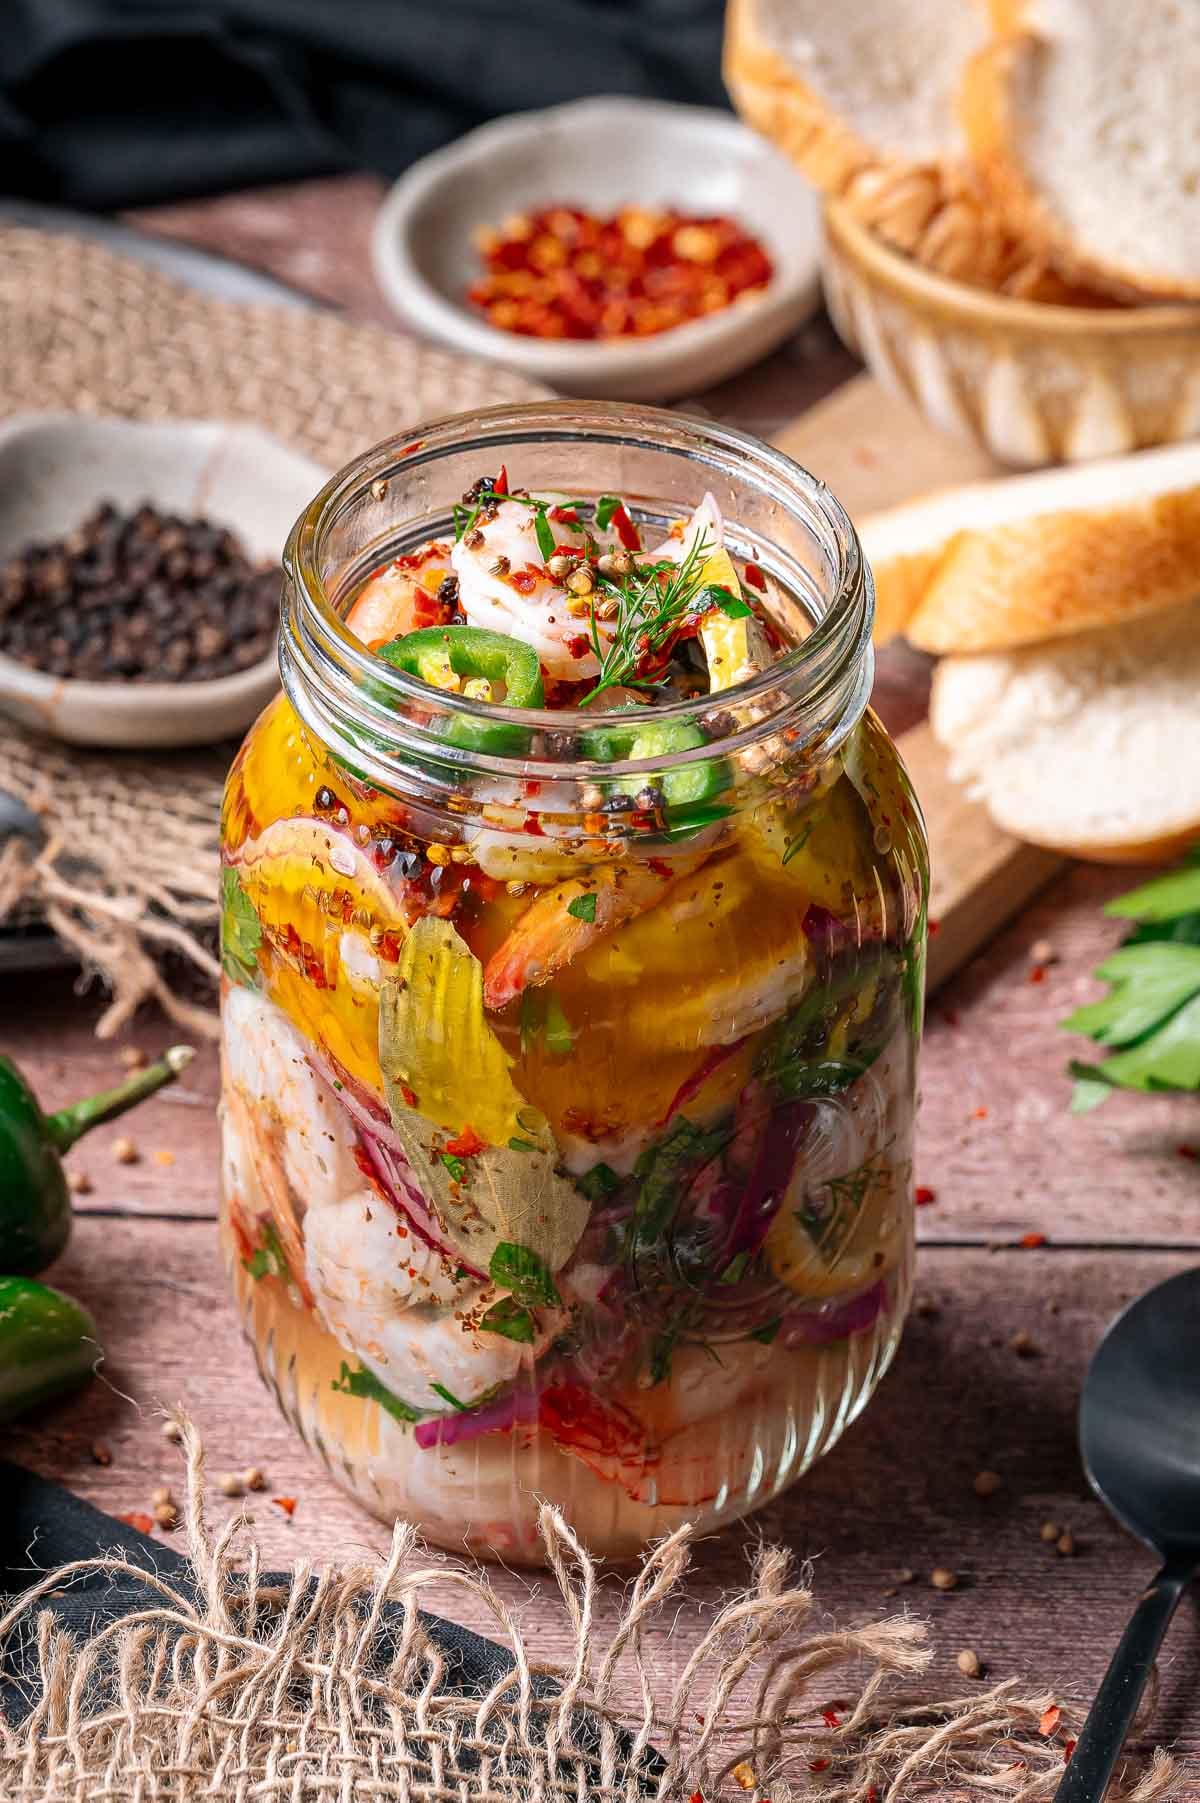
- Large glass jar or airtight container: wide-mouth works best for layering and stirring. Glass is preferred; vinegar and lemon juice can pick up off-flavors from plastic over several hours.
- Medium bowl and whisk
📝 How to Make Pickled Shrimp
- Prep the shrimp. If frozen, thaw completely. Drain the shrimp well and blot with paper towels until they feel dry to the touch, not just damp. Any water left on the shrimp will dilute the brine.
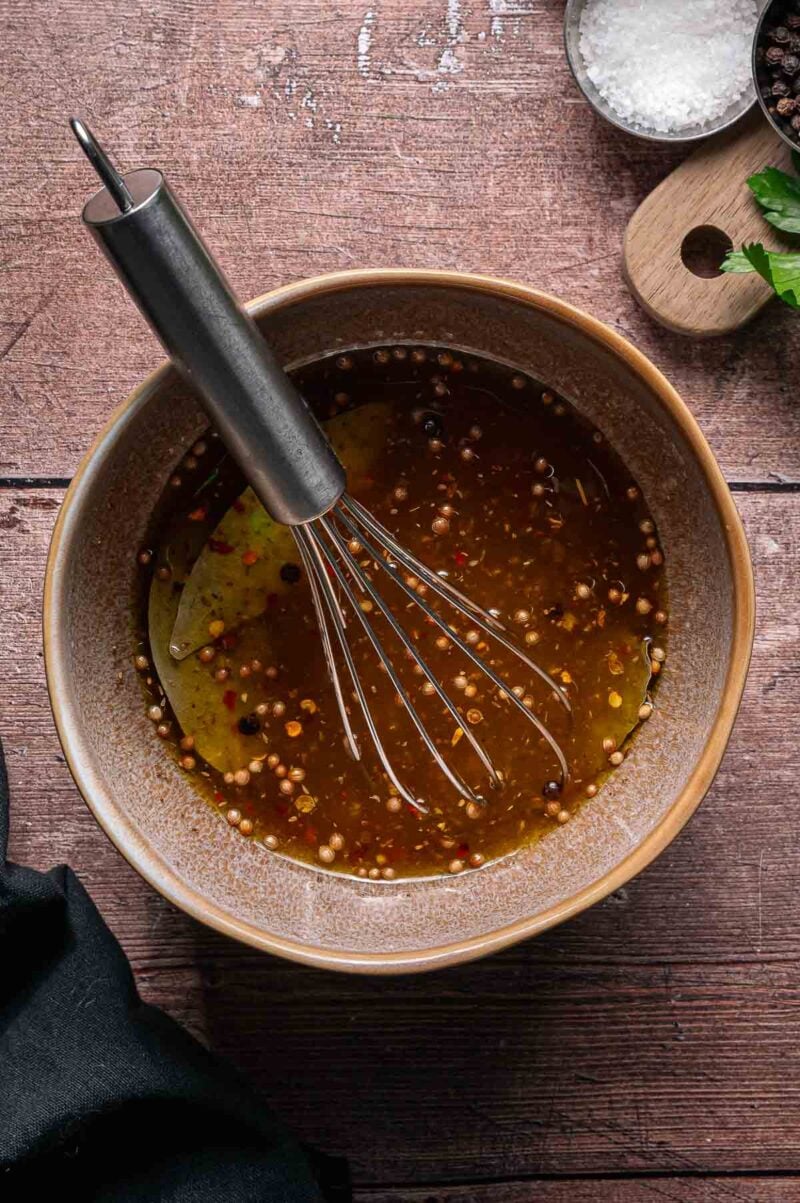
- Make the pickling liquid. Whisk together the white wine vinegar, olive oil, lemon juice, sugar, kosher salt, mustard seeds, celery seed, black peppercorns, red pepper flakes, and bay leaves in a medium bowl. Whisk until the sugar is fully dissolved, about 1 minute.
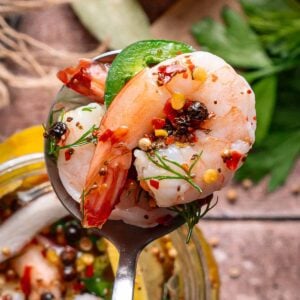
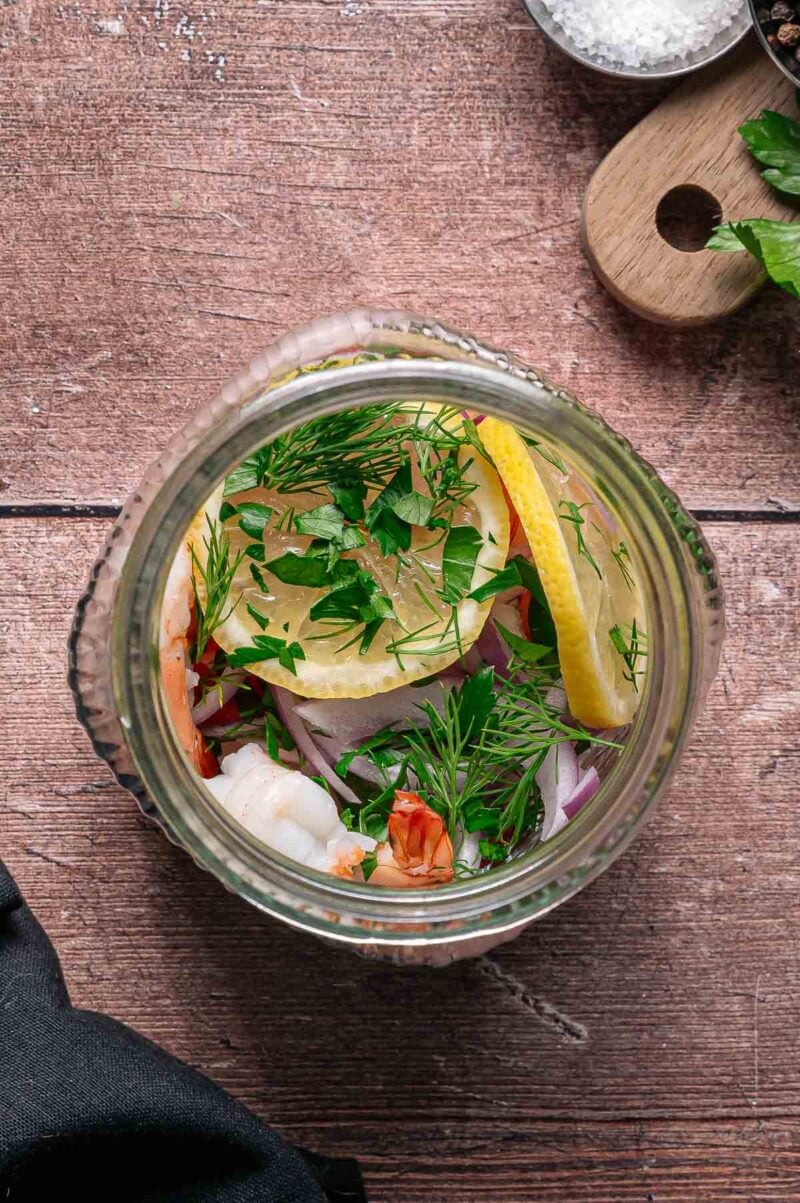
- Layer the jar. Add the shrimp, sliced serrano or jalapeño, red onion, lemon slices, parsley, and dill to a large glass jar or airtight container. Layer them so the aromatics are distributed throughout, not all on top.
- Pour and press. Pour the pickling liquid over everything. Press the solids down gently so the shrimp are surrounded by the liquid rather than floating above it.
- Chill. Cover and refrigerate for at least 4 hours. If you can, give the jar a gentle stir or turn it once at the 2-hour mark to help the onion, pepper, and herbs distribute more evenly.
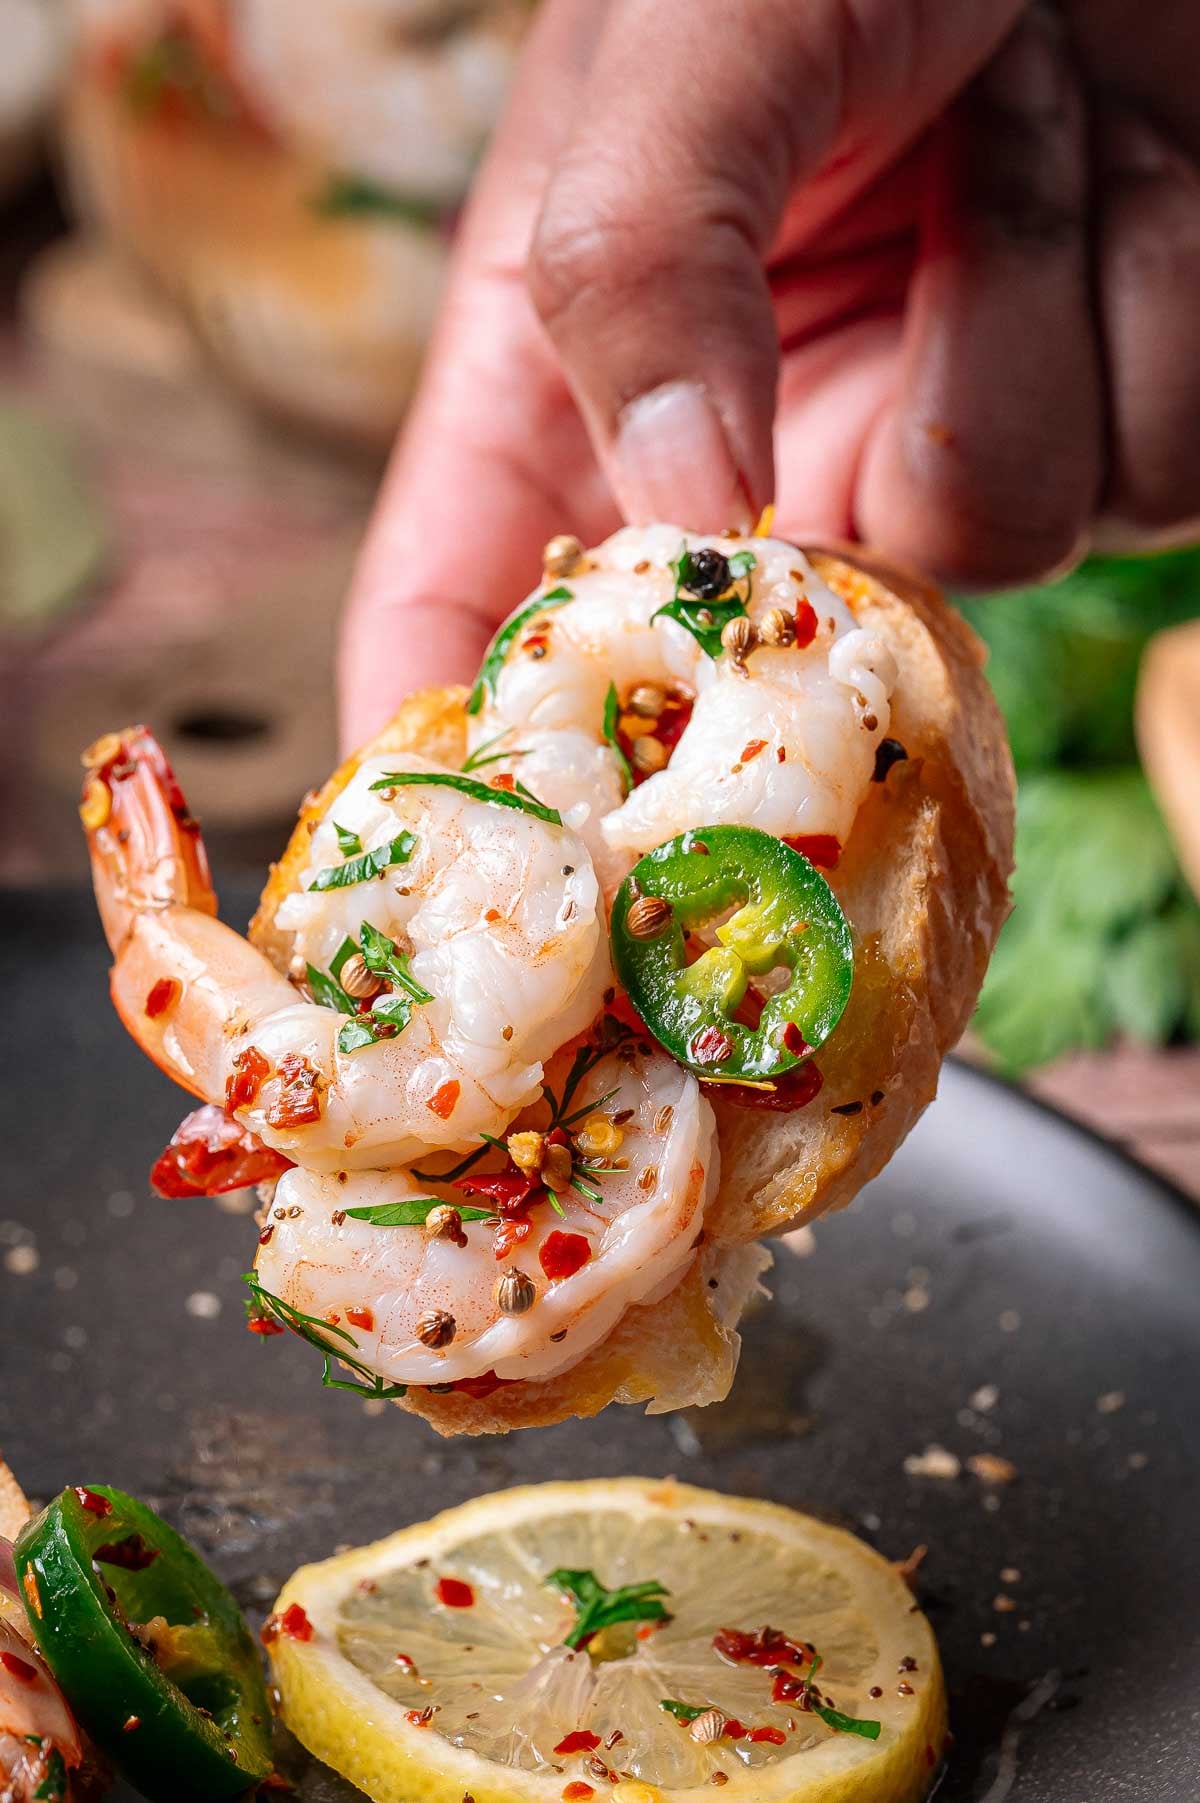
- Taste before serving. Pull it from the fridge and taste one shrimp. If it needs brightness, squeeze in a little fresh lemon juice right before serving. Serve cold with a slotted spoon straight from the jar.
🔄 Substitutions
- Serrano vs. jalapeño: Use serrano for sharper, more penetrating heat that you’ll notice in every bite. Use jalapeño when you want warmth that’s present but not the main event.
- Apple cider vinegar for white wine vinegar: Works in a pinch. The brine picks up a slightly warmer, more rounded flavor. It’s less clean and bright than the white wine version. Both are good, but they taste different.
- Dill for extra parsley: If dill isn’t your thing, replace it with more parsley. The brine will taste more vegetal and less aromatic… still a solid jar of pickled shrimp, just a different character.
- Tail-on vs. tail-off shrimp: Tail-on looks better on a platter and is the right call for a party display. Tail-off is easier to eat in a bowl or as a topping. The brine does the same thing to both.
- Pre-cooked vs. raw shrimp: This recipe is built around pre-cooked. Raw shrimp won’t get cooked through in the pickling liquid alone; if you’re starting from raw, you need to cook them first.
💡 Meat Nerd Tips
- The dry shrimp rule is non-negotiable. Frozen pre-cooked shrimp release a surprising amount of water as they thaw. If you skip the blotting step, that water bleeds into the brine within the first hour and flattens the whole thing. The brine should taste sharp and punchy when you pour it; any dilution kills that.
- Use a glass jar, not plastic. Vinegar and lemon juice can pick up off-flavors from plastic containers over several hours. A wide-mouth Mason jar is perfect, making it easy to layer and stir.
- The four-hour minimum is real. At two hours, the onion is still sharp and the shrimp taste mostly like shrimp. At four hours, the brine has worked through everything. The sweet spot is overnight in the fridge – that’s when the onion fully mellows and the spices really open up.
- Make more than you think you need. This is one of those things that goes faster than expected, especially at parties. A double batch is easy, and the recipe scales directly.
🍽️ What to Serve with Pickled Shrimp
- Butter crackers or crostini: the classic move; let people build their own bites straight from the jar.
- Thinly sliced baguette: a little more substantial if you want something to soak up the brine.
- Shrimp cocktail shooters: pair them together when you want a full shrimp spread as the centerpiece.
- Maine lobster rolls: the two together make a serious cold seafood anchor for any party table.
- A cold seafood dinner: serve as a starter before any main from the easy seafood recipes collection.
🧊 Leftovers and Storage
- Store in the refrigerator in a tightly sealed glass jar or container for up to 5 days.
- Best in the first 2 days, when the shrimp still tastes fresh, and the onion still has a little texture and bite.
- Do not freeze. The shrimp will turn rubbery, and the brine will separate when thawed.
- Serve straight from the fridge with a slotted spoon. These are meant to be eaten cold.
Have you tried this recipe? Do us a favor and rate the recipe card with the ⭐ ⭐ ⭐ ⭐ ⭐ and drop a comment to help out the next reader.
Pickled Shrimp
Ingredients
- 1 pound large shrimp cooked thawed, peeled and deveined
- 1/2 cup white wine vinegar
- 1/2 cup olive oil
- 2 tablespoons lemon juice
- 2 teaspoons granulated sugar
- 1 teaspoon kosher salt
- 1/2 teaspoon mustard seeds
- 1/2 teaspoon celery seed
- 1/2 teaspoon black peppercorns
- 1/4 teaspoon crushed red pepper flakes
- 3 bay leaves
- 1 serrano or jalapeño pepper thinly sliced
- 1/2 cup red onion thinly sliced
- 1/2 lemon thinly sliced
- 2 tablespoons fresh parsley chopped
- 1 tablespoon fresh dill chopped
Instructions
Prep the Shrimp
- If frozen, thaw the shrimp completely. Drain well and blot dry with paper towels until the shrimp feel dry to the touch, not just damp.
Make the Pickling Liquid
- Whisk together the white wine vinegar, olive oil, lemon juice, sugar, kosher salt, mustard seeds, celery seed, black peppercorns, red pepper flakes, and bay leaves in a medium bowl until the sugar fully dissolves, about 1 minute.

Layer the Jar
- Add the shrimp, sliced serrano or jalapeño, red onion, lemon slices, parsley, and dill to a large glass jar or airtight container, distributing the aromatics throughout.
Pour and Press
- Pour the pickling liquid over the layered shrimp. Press the solids down gently so the shrimp are surrounded by the liquid.
Chill
- Cover and refrigerate for at least 4 hours. Stir or gently turn the jar once at the 2-hour mark if possible.
Serve
- Taste before serving. Add a small squeeze of fresh lemon juice if it needs brightness. Serve cold with a slotted spoon.

Notes
- Best in the first 2 days; stays good up to 5 days refrigerated in a sealed glass container. – Do not freeze – the shrimp will turn rubbery.
- Use a glass container; vinegar and lemon can pick up off-flavors from plastic.
- This recipe uses pre-cooked shrimp. Do not use raw shrimp without cooking first.
Nutrition
Bookmark this recipe now!
Quick Summary
Pickled shrimp are a no-cook cold appetizer built on a sharp, herby white wine vinegar brine. The key is dry shrimp and enough time in the fridge — four hours minimum, overnight if you can swing it. Make them the day before a party and they’ll be the first thing gone.
❓ FAQs
Not in this recipe. The pickling liquid is not acidic enough to safely “cook” raw shrimp the way a ceviche-style recipe would – and even in ceviche, cold acid doesn’t kill pathogens the same way heat does. Start with pre-cooked shrimp every time. If you’re buying raw, poach them for 2 to 3 minutes until just opaque, let them cool completely, then proceed with the recipe.
Up to 5 days in a sealed glass container. Quality starts to slip after day 2 – the shrimp texture softens, and the fresh herb flavor fades. They’re still safe to eat, just not at their best. Make them the day before you need them and plan to finish them within 48 hours for peak results.
Yes. Double the parsley, and you’ll still have a solid jar of pickled shrimp. The brine will taste more herbal and less aromatic — dill is one of the main flavor drivers in the jar, so pulling it changes the character meaningfully. Still worth making; just know it’s a different result.