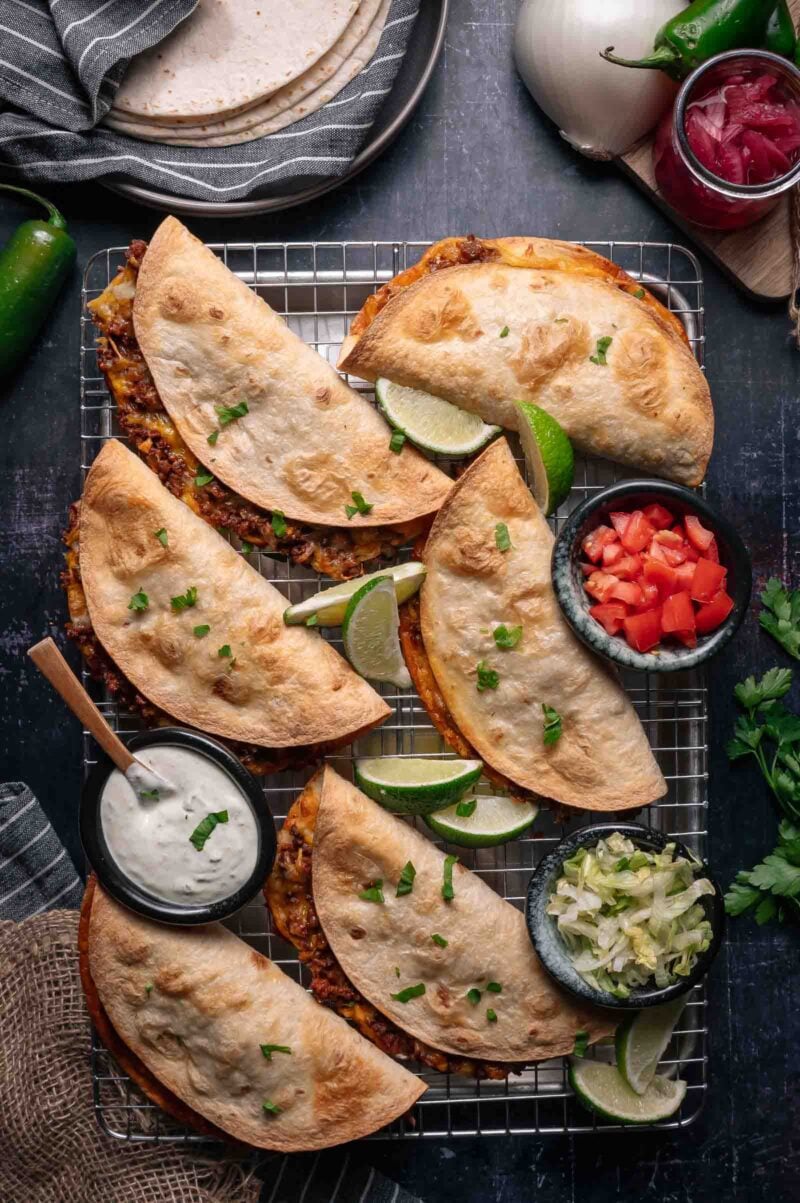
We have firm rules about tacos. Ground beef gets crispy shells. Everything else gets a soft shell. So when we set out to nail a family dinner that comes off one sheet pan and lands hot and crackling in front of everyone at the same time, we did not mess around.
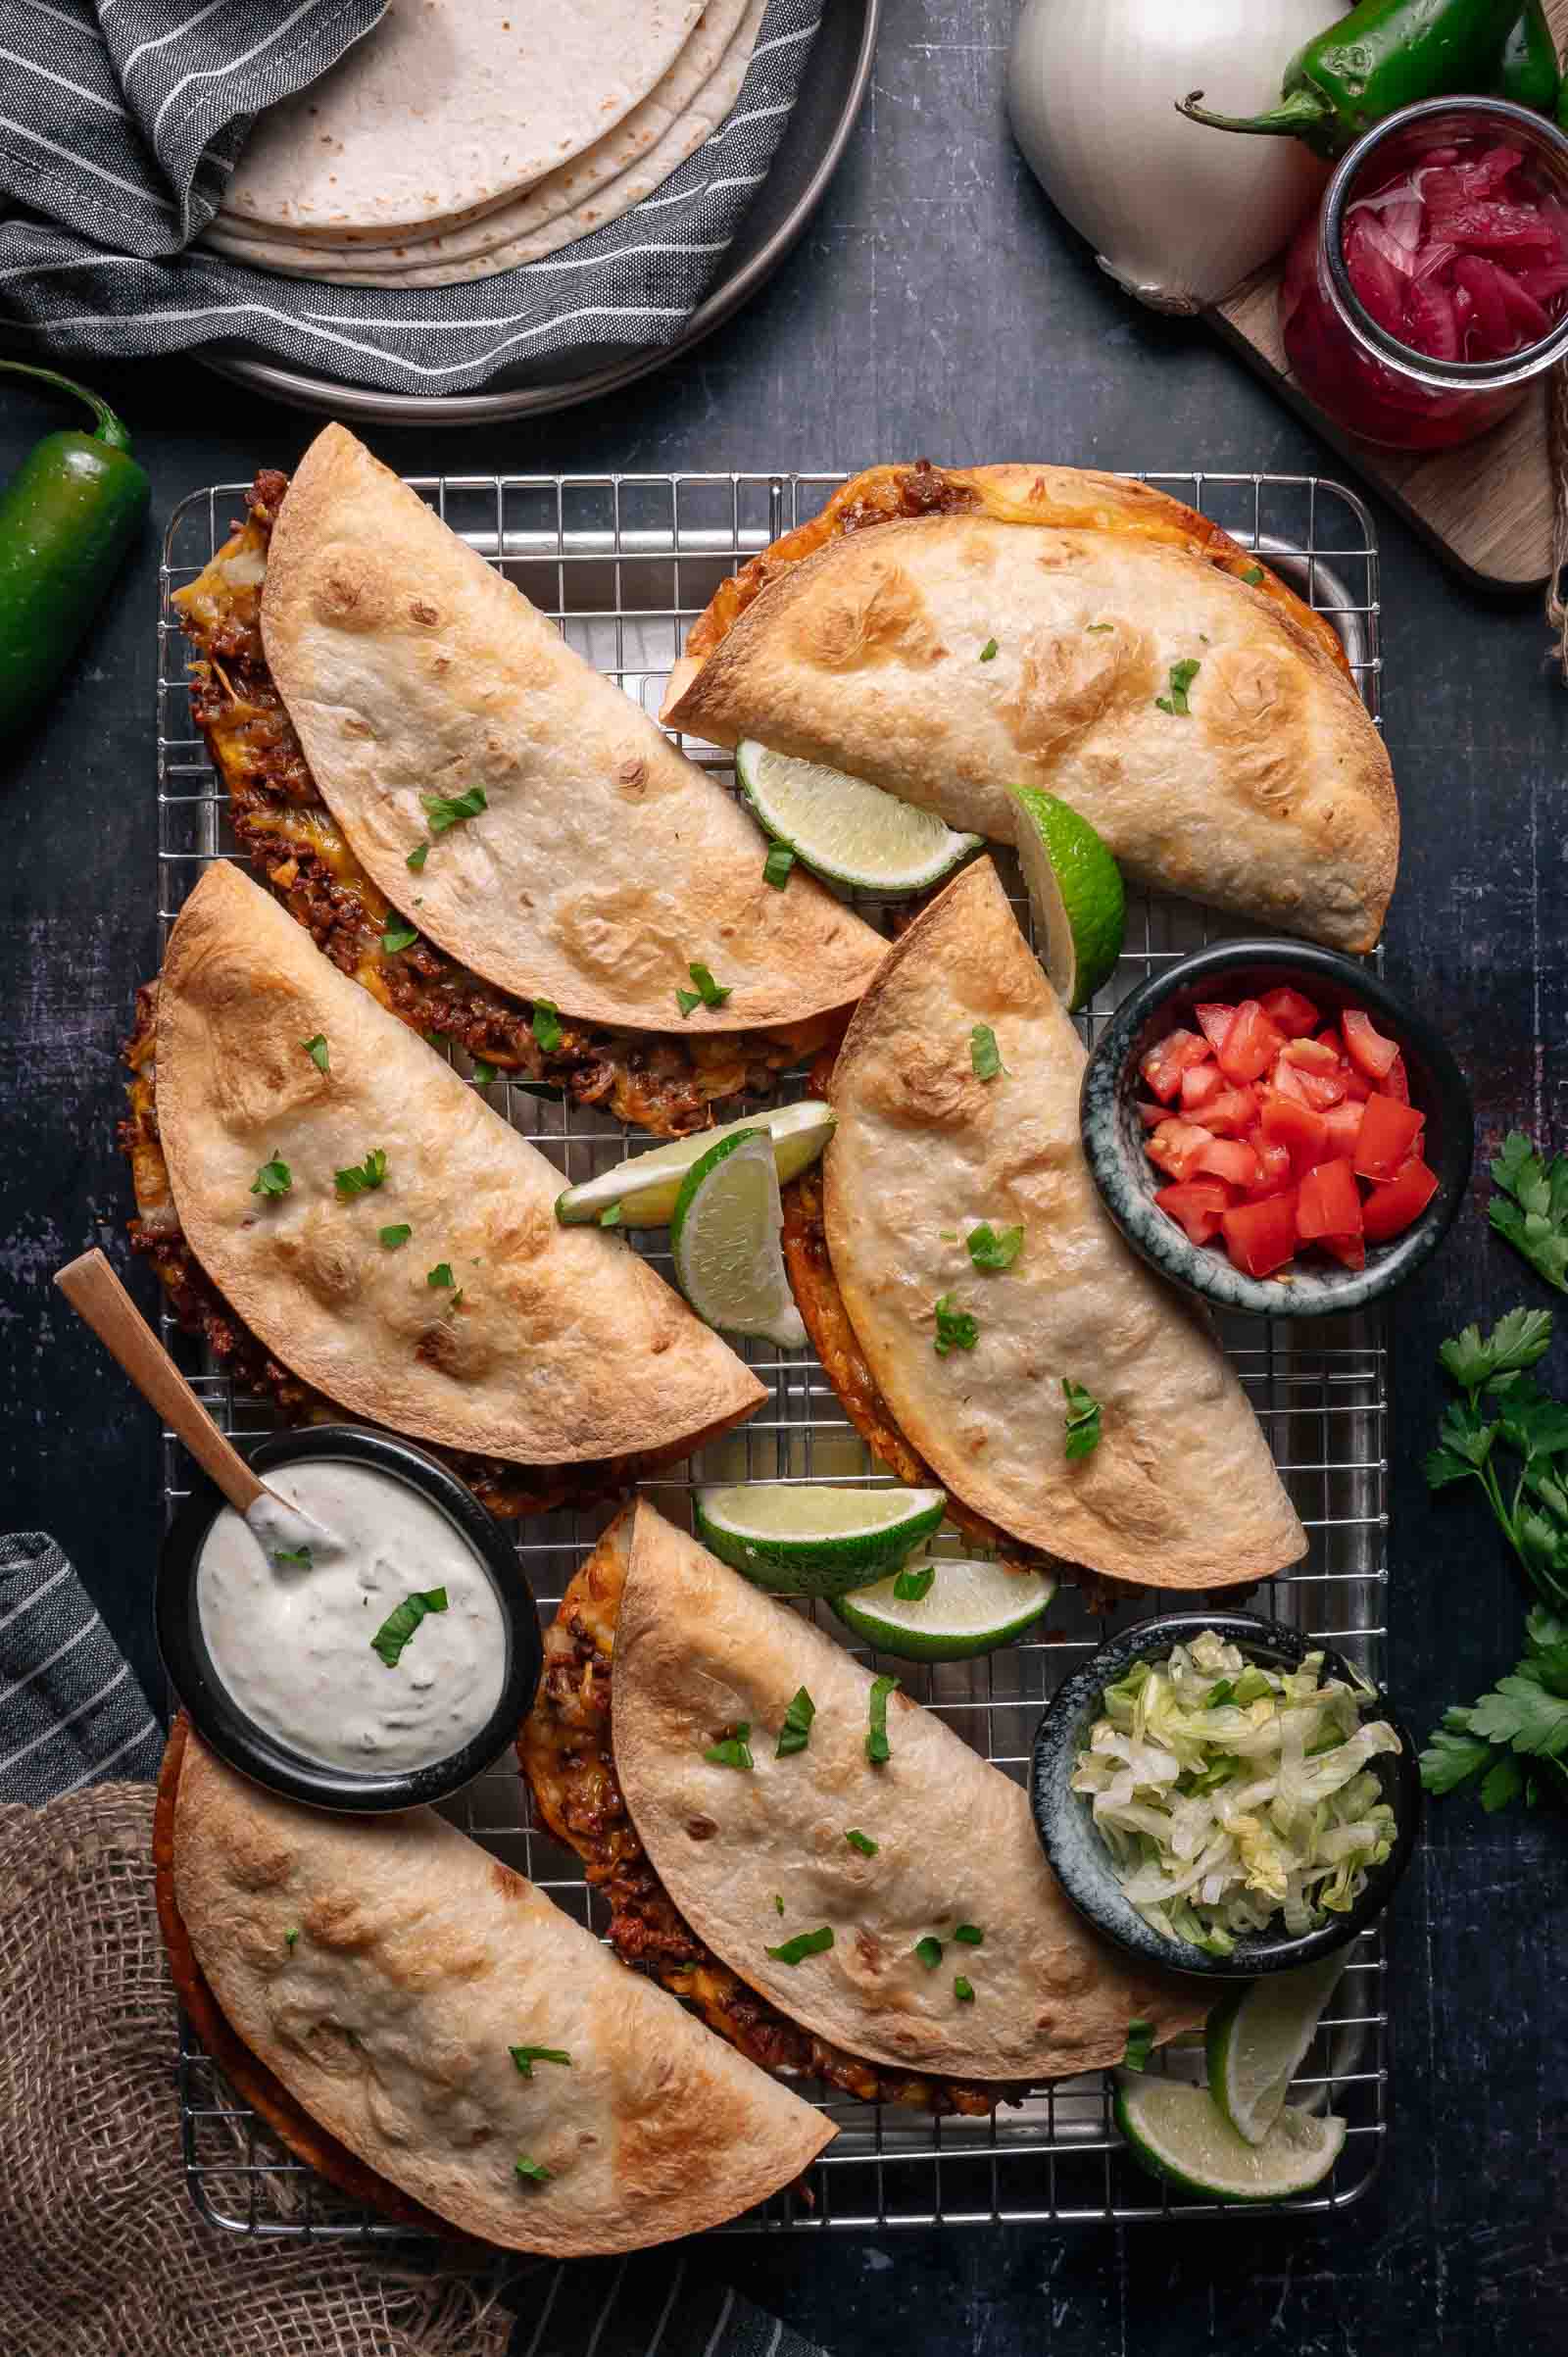
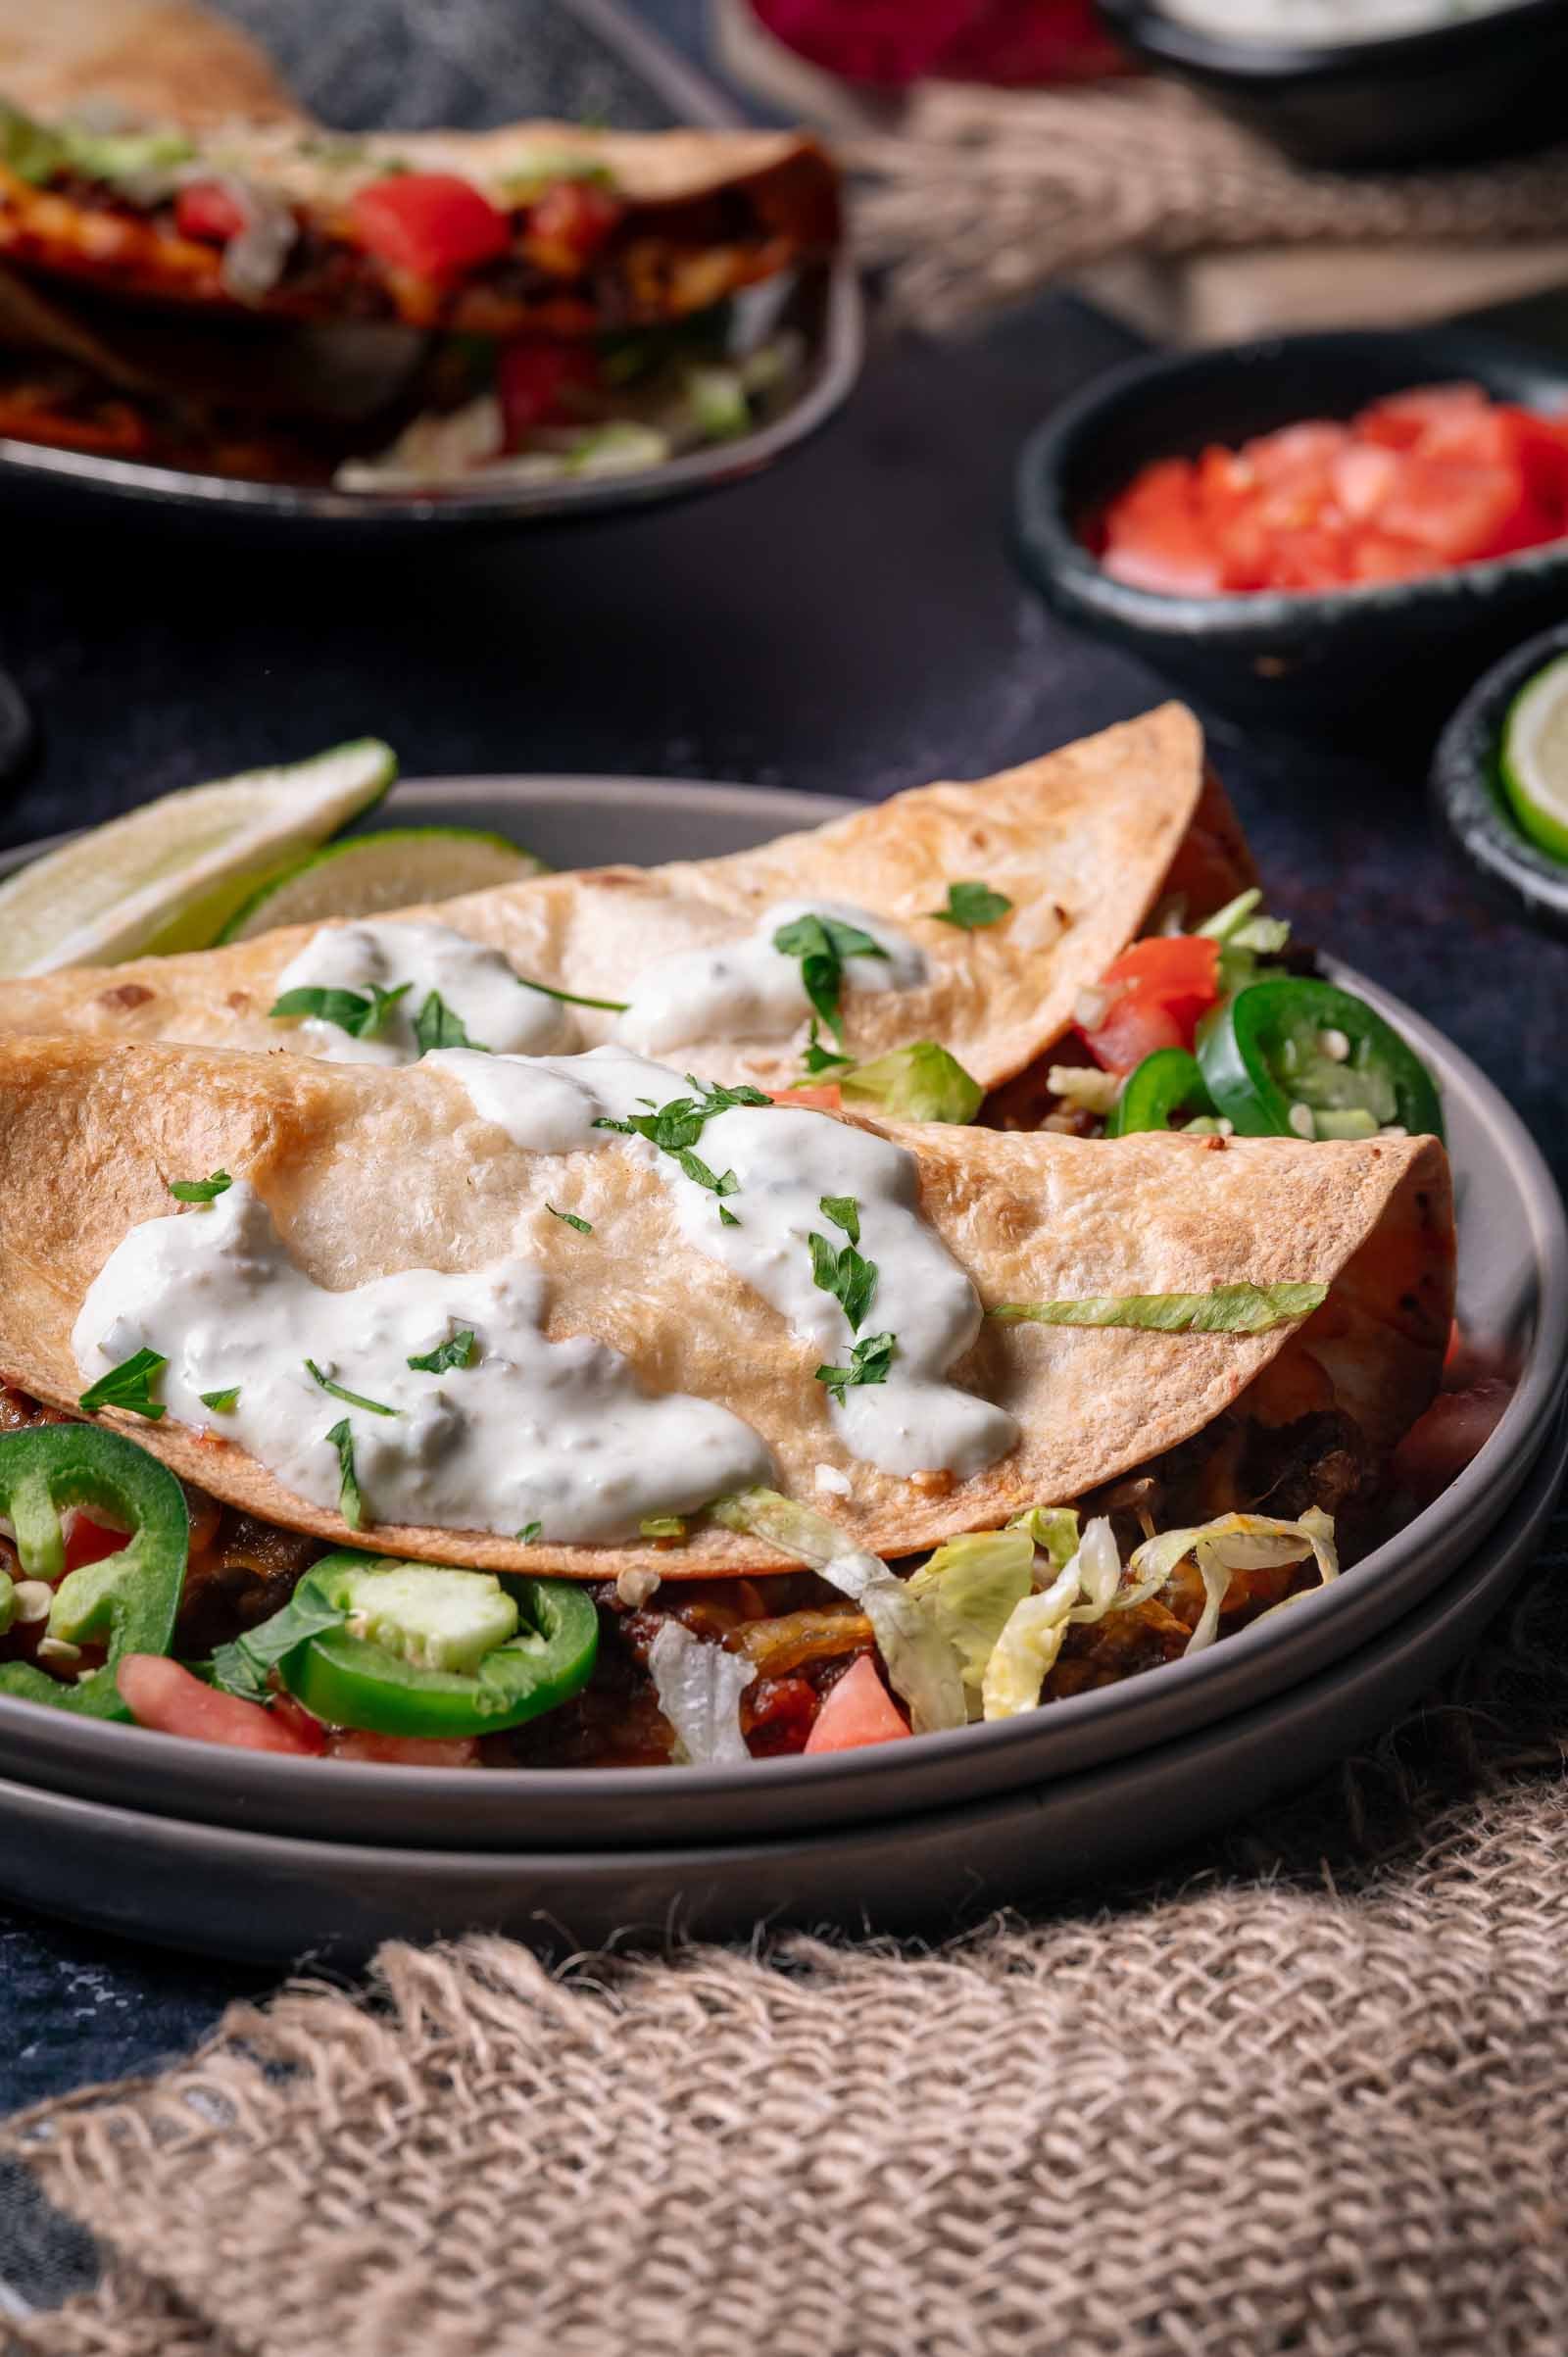
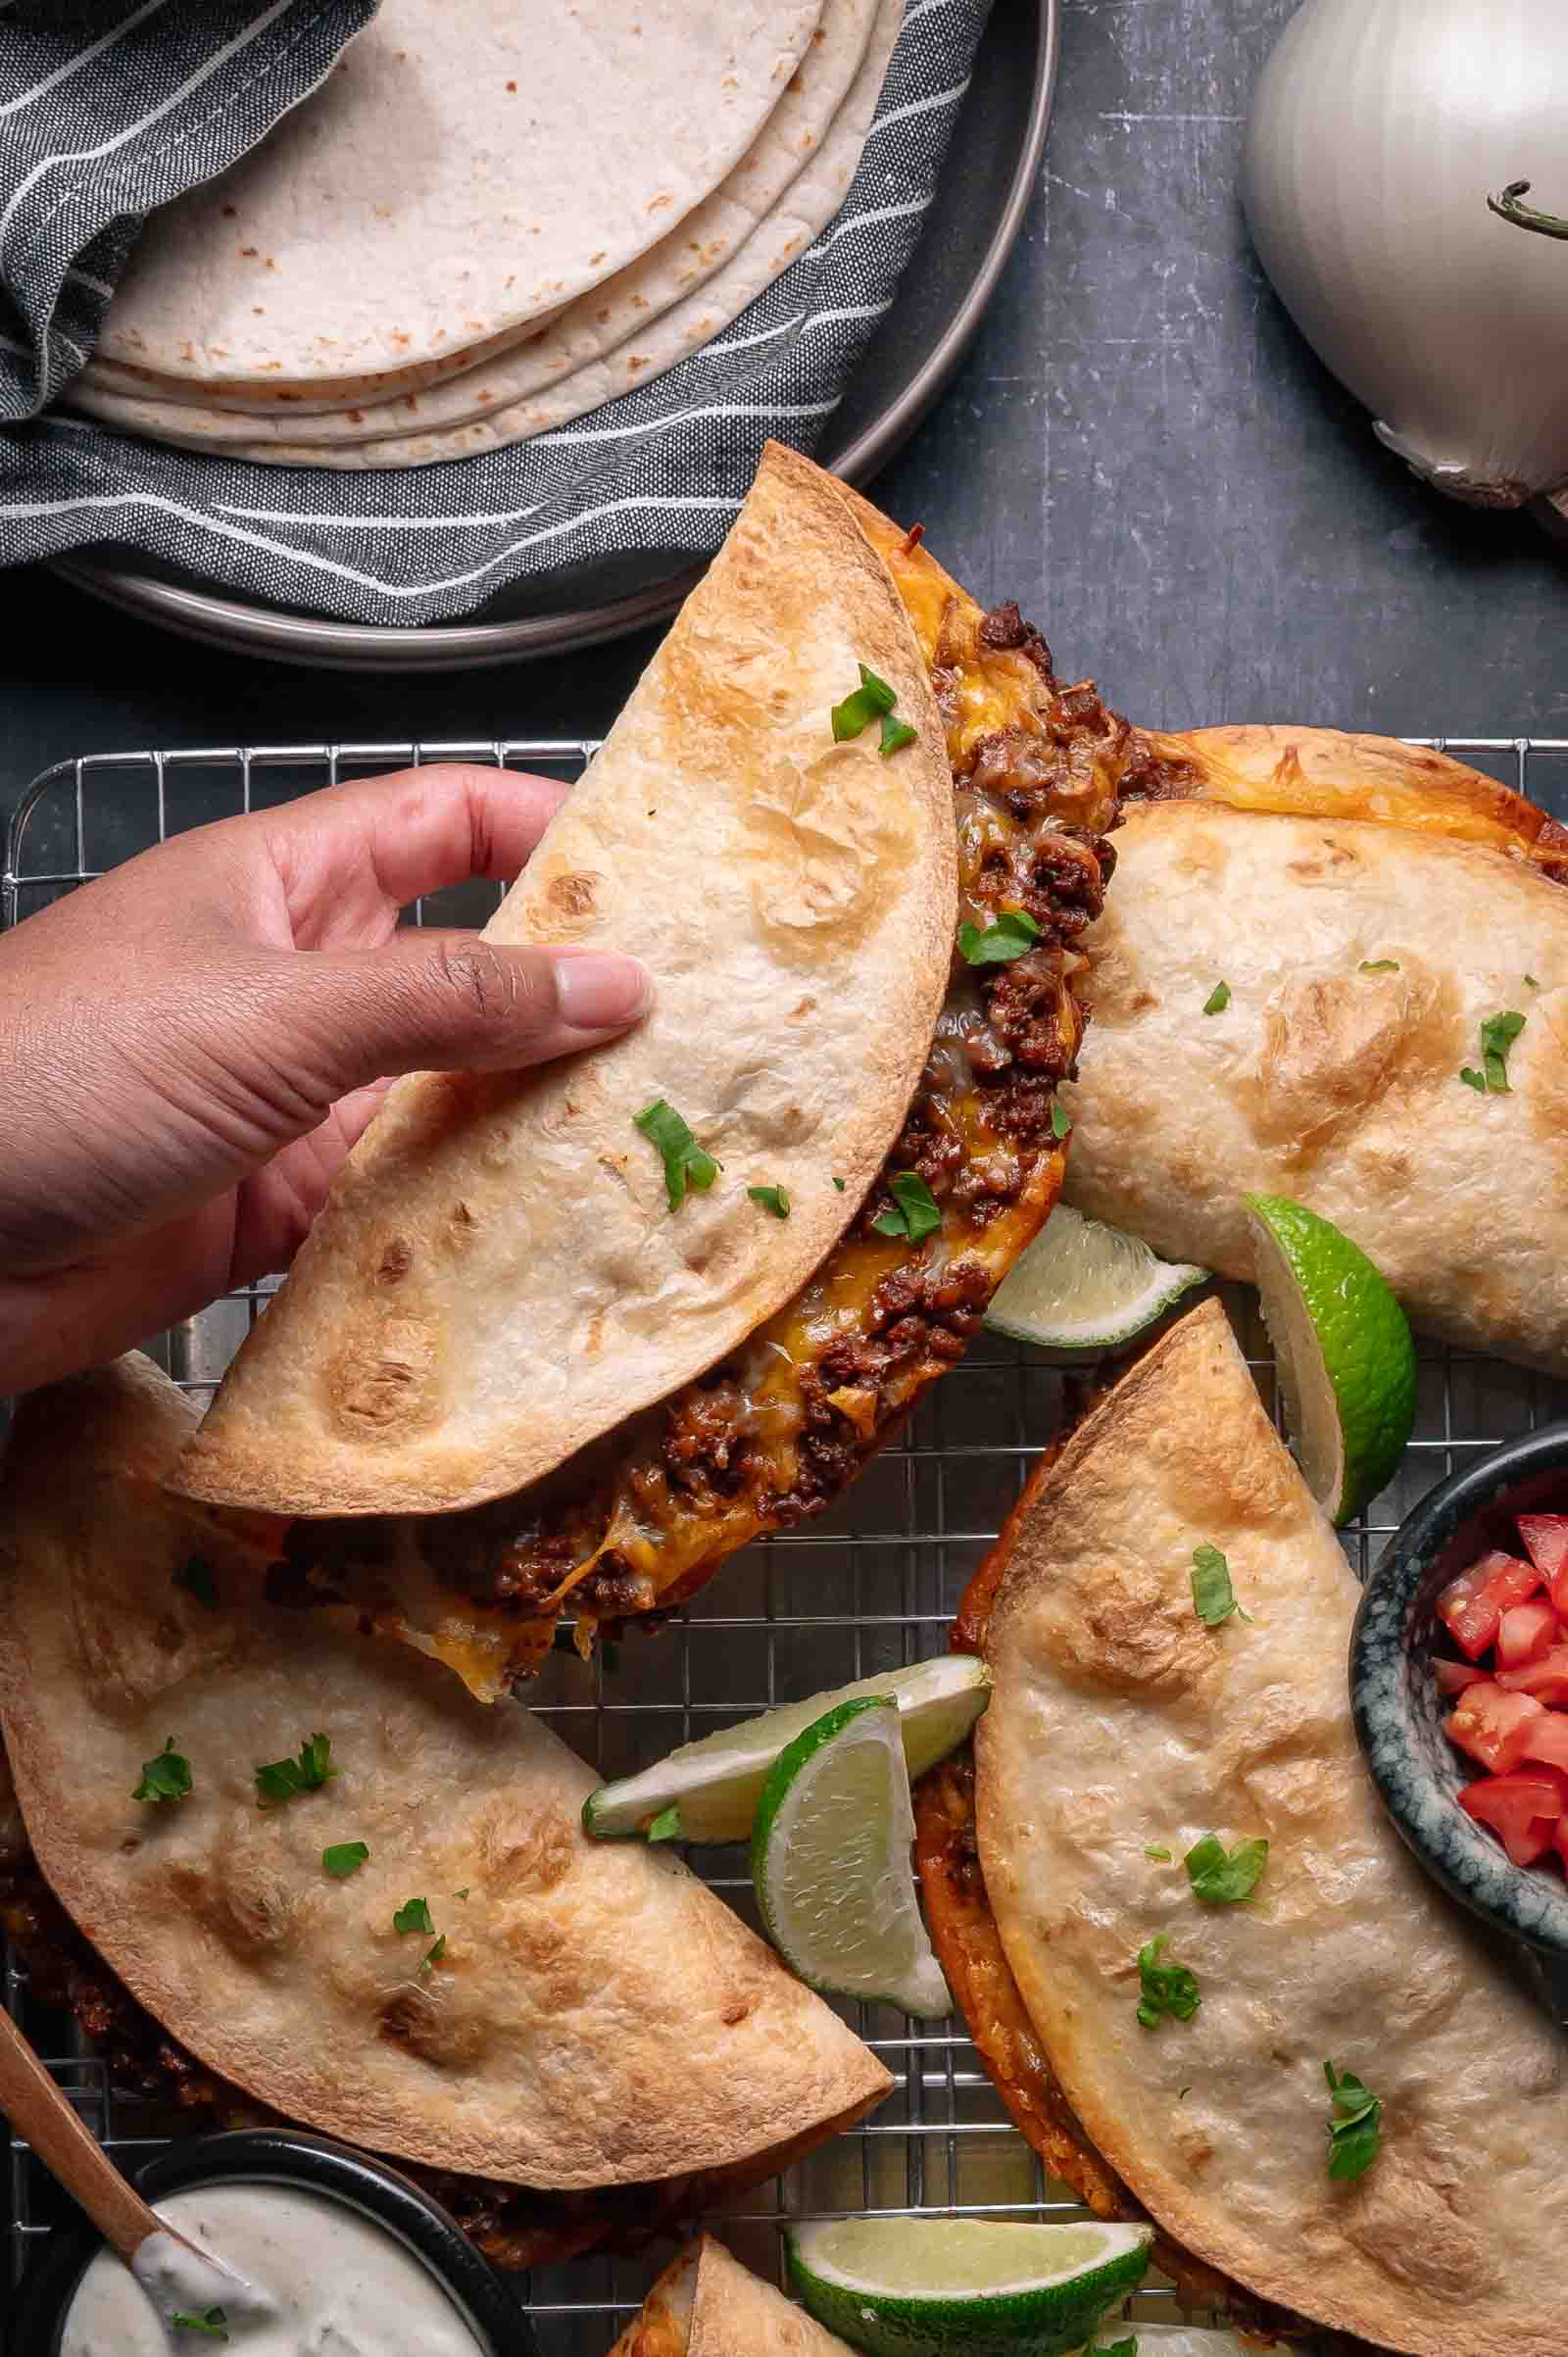
We’re a little obsessed with the perfect amount of cheese for a good beef taco. Put the beef on a bare tortilla first, and the filling steams the shell, making it a soggy mess. By the time you fold, you’ve made a soft taco. The fix is counterintuitive: cheese goes on the tortilla first, then the beef, then cheese again on top (which is the perfect cheese-to-beef ratio). The rest is up to you – but we wouldn’t skip our jalapeno sour cream sauce – it adds a velvety creaminess with just the right dose of heat.
🔪 Ingredients for Baked Crispy Beef Tacos
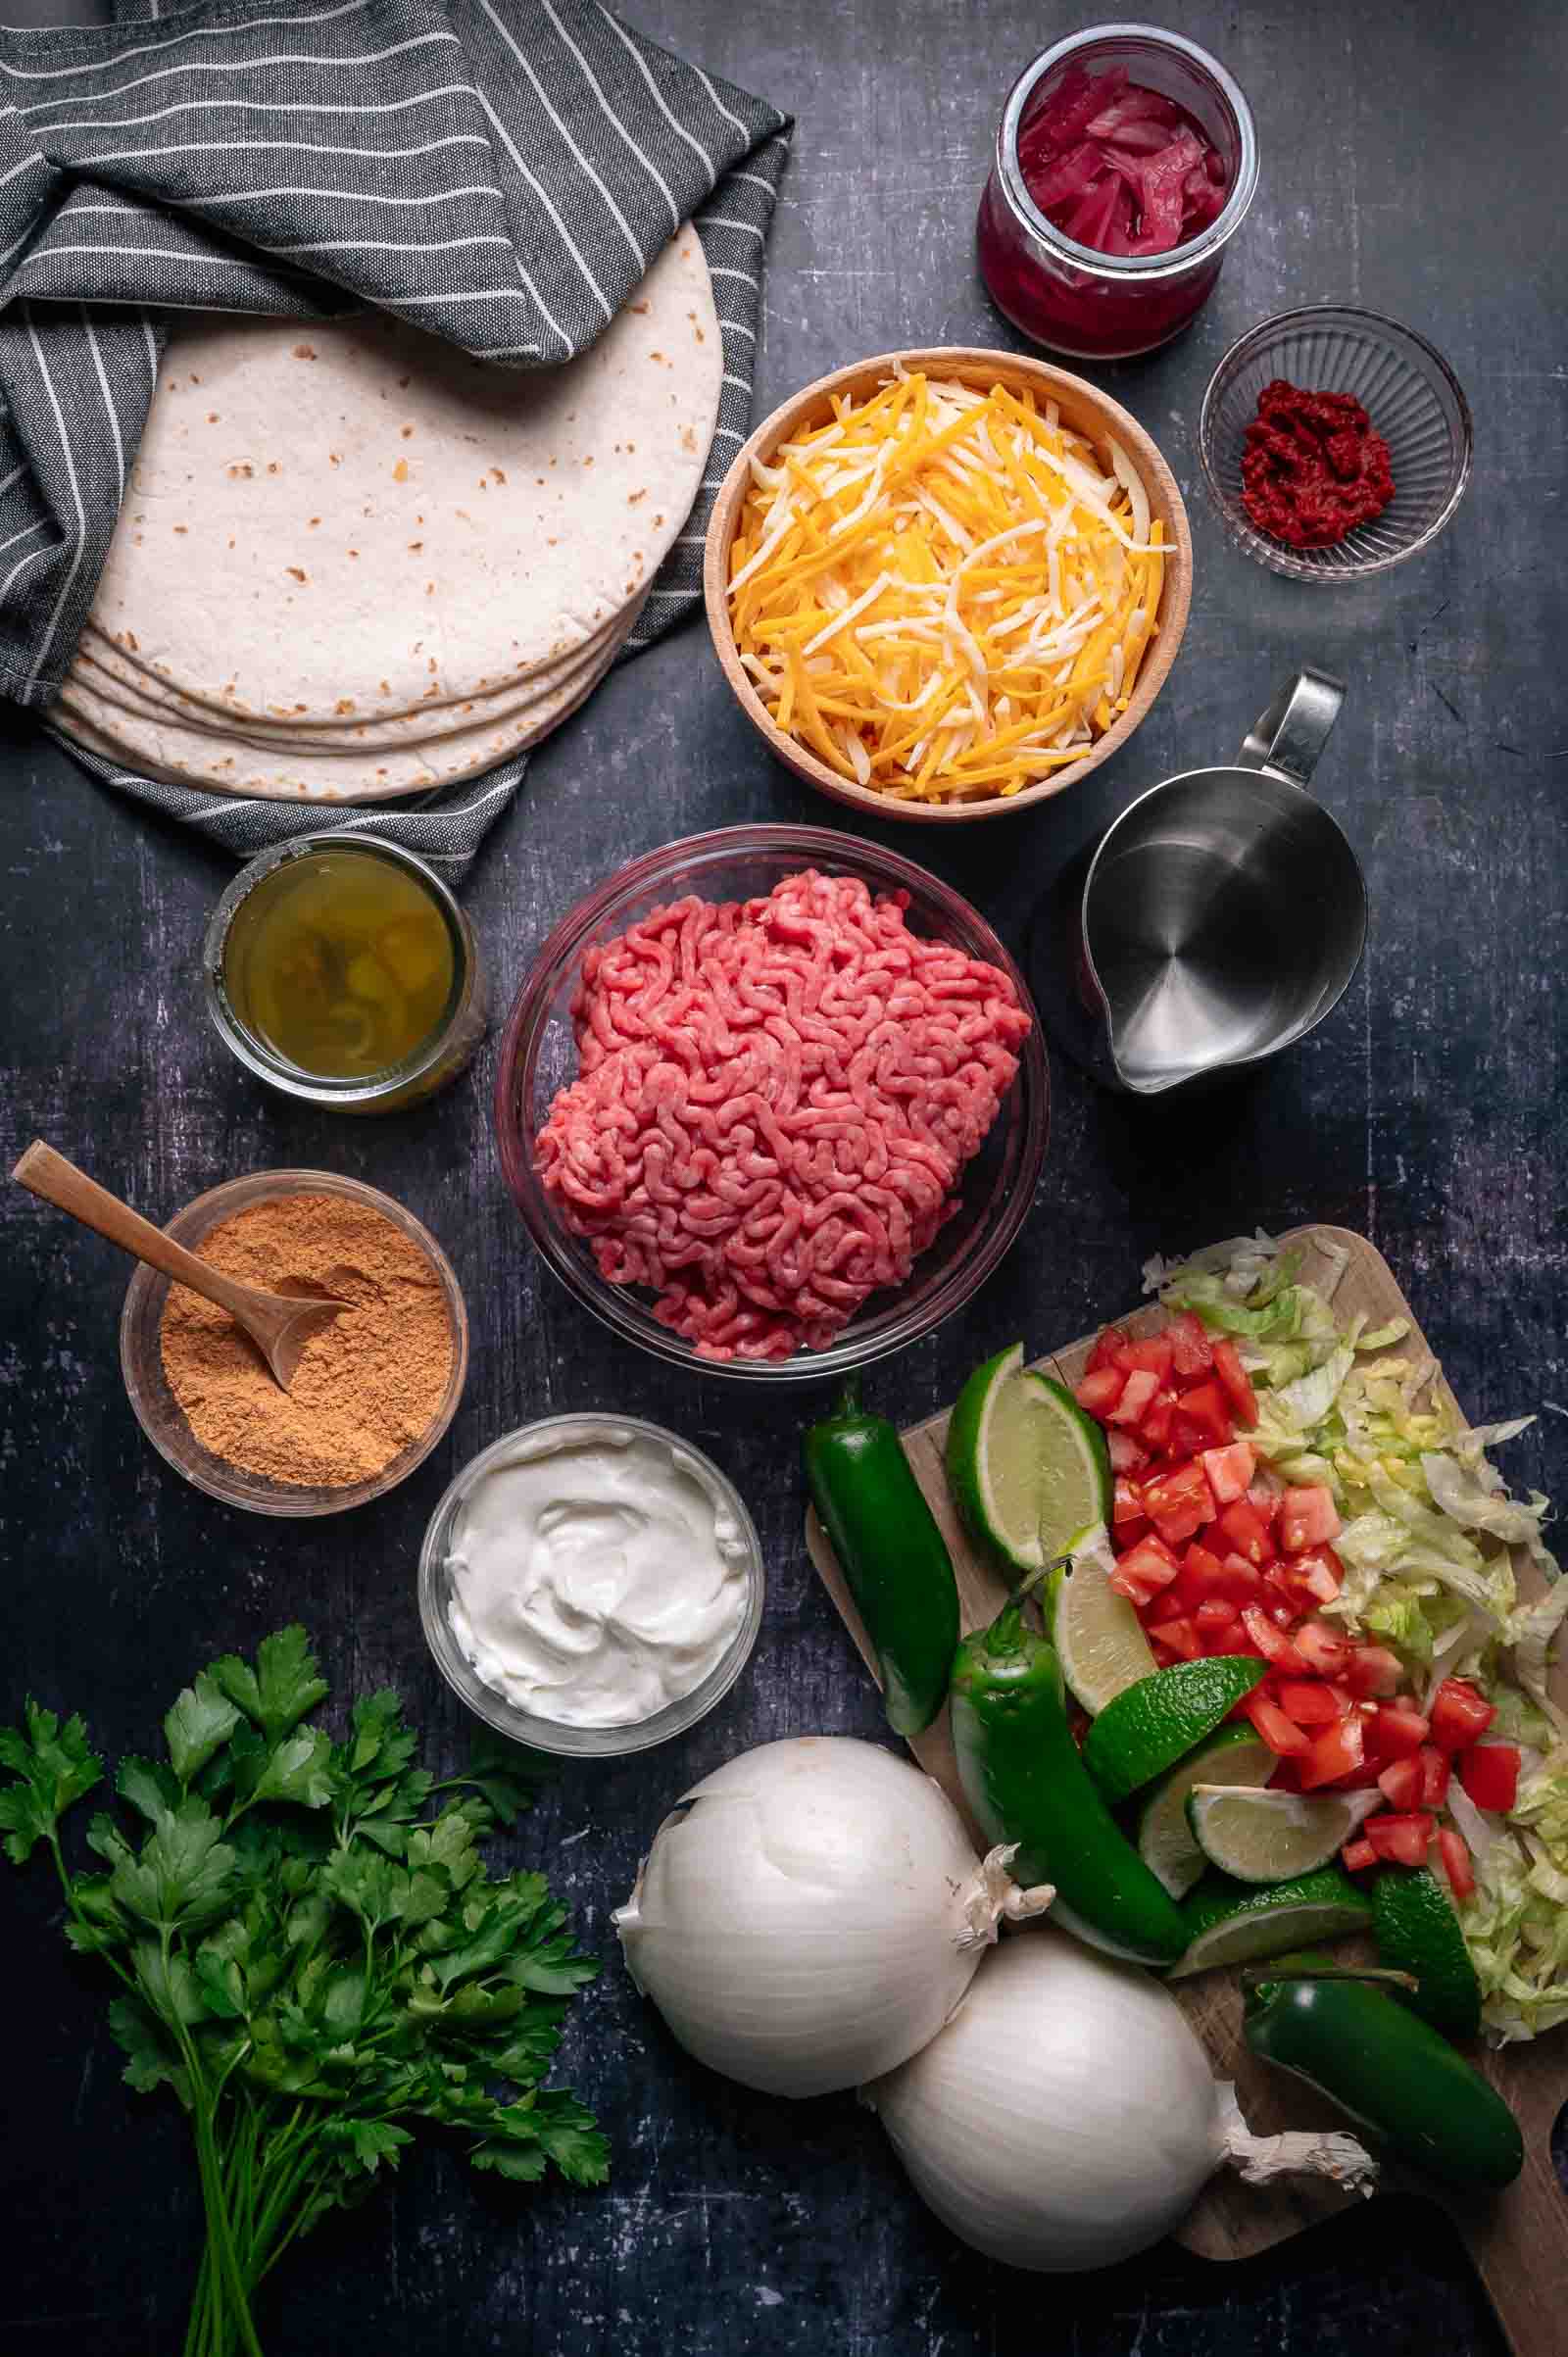
For the Beef Filling
- Ground beef: 80/20. Leaner beef dries out before the fat has time to season anything. Drain the excess grease after browning, but you want that marbling doing its job through the cook.
- White onion: dice it small so it cooks through in the same window the beef takes.
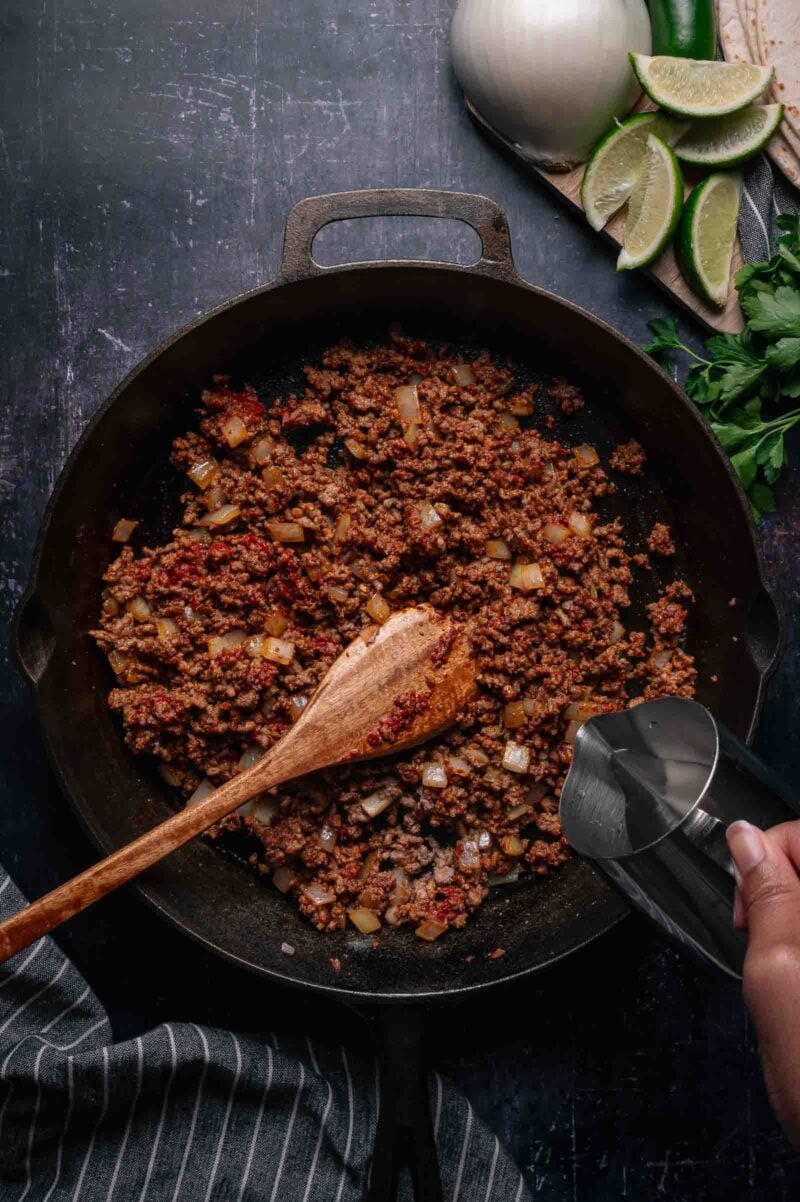
- Tomato paste: bloom it in a dry center of the pan before stirring it in. That 30-second step caramelizes the paste and adds the umami depth a seasoning packet alone can’t deliver.
- Taco seasoning: store-bought packet works. If you make your own, use about 2 to 3 tablespoons of a blend built around cumin, chili powder, and garlic powder.
- Water
For Assembly
- Avocado oil spray: a light coating on the baking sheet is enough.
- Flour tortillas: 8-inch is the right size. Corn tortillas crisp faster and more aggressively, but they’re more likely to crack when you fold. Flour gives you a golden, crackling edge with a more forgiving fold.
- Mexican cheese blend: pre-shredded is fine here because it’s acting as a structural layer, not a finishing element. Colby Jack or Oaxaca also work well.
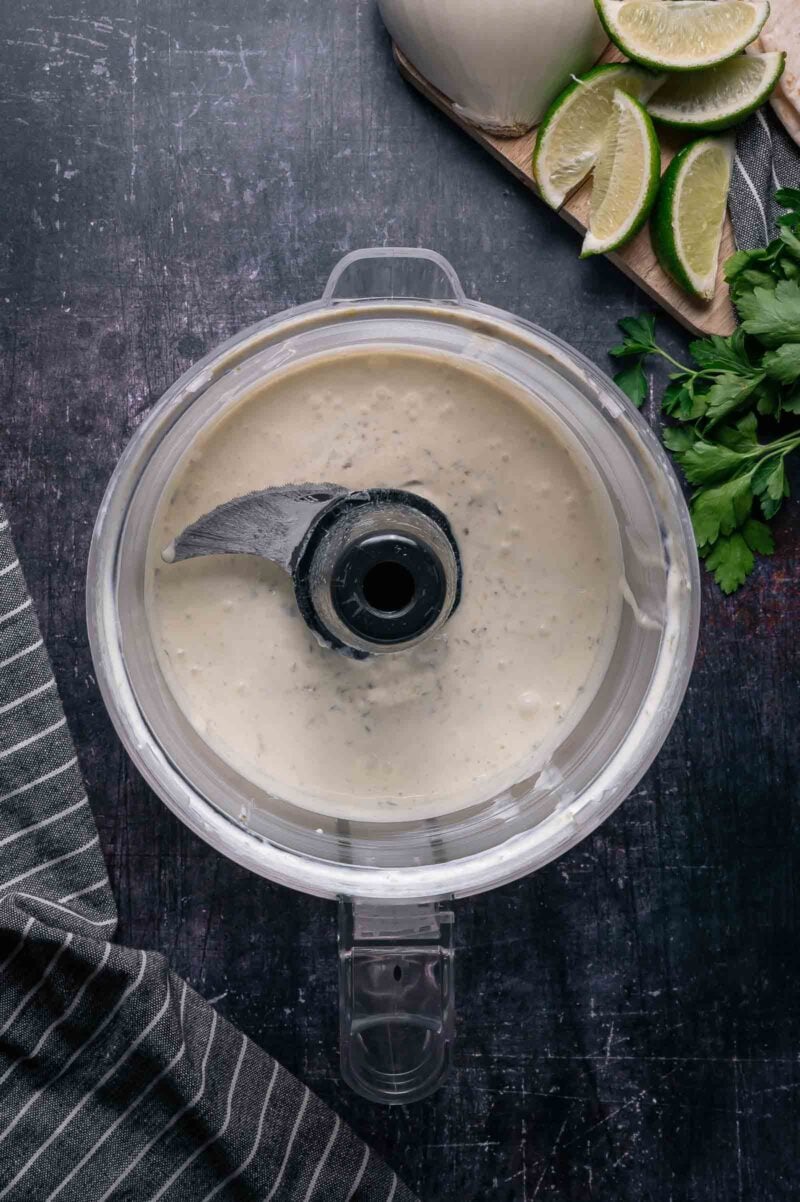
For the Jalapeño Sour Cream
- Sour cream
- Pickled jalapeño brine: this is the thing that makes the sauce. The brine brings acidity, heat, and exactly the right consistency for drizzling without adding chunks. Mezzetta runs milder, Goya runs hotter.
- Pickled jalapeños: adds body and a sharper jalapeño hit. If you want it smoother, blend longer. If you want texture, pulse rather than purée.
📝 How to Make Baked Crispy Beef Tacos
- Preheat the oven to 400°F.
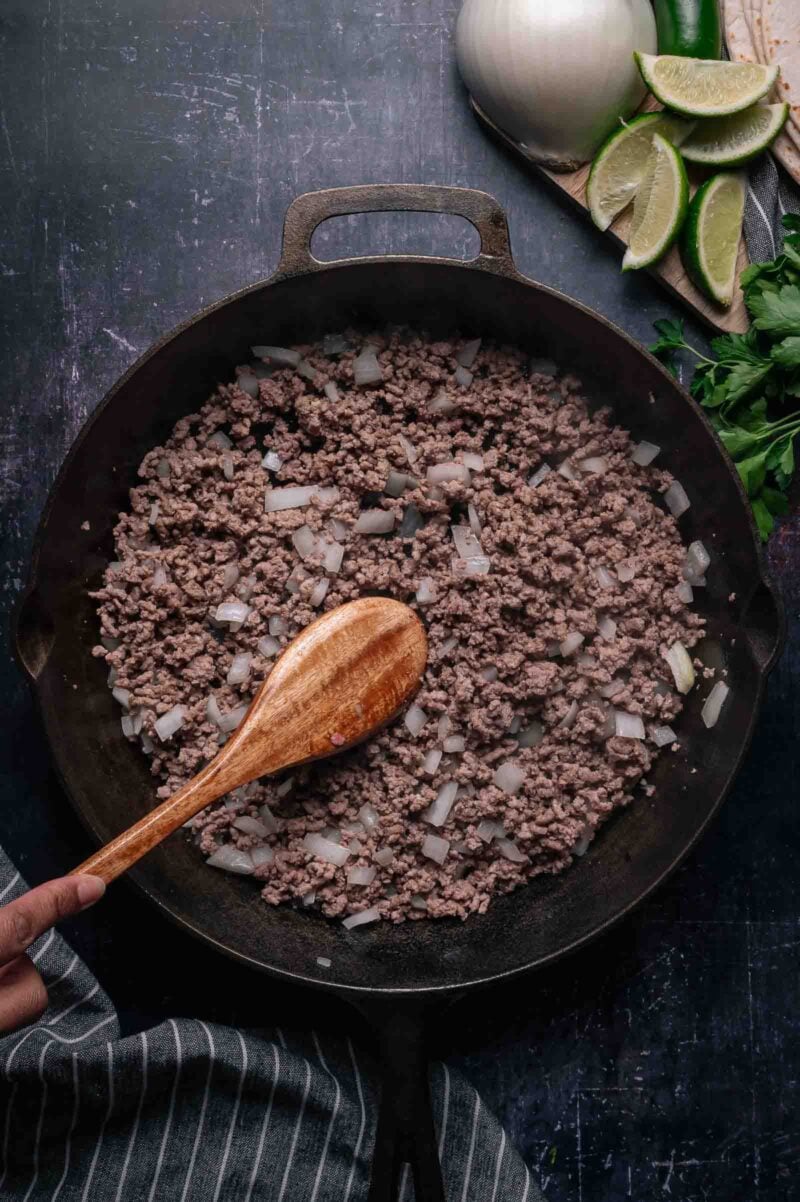
- Heat a large skillet over medium heat. Add the ground beef and break it into small crumbles with a wooden spoon. Cook until halfway browned, 4 to 5 minutes. Add the diced white onion. Continue cooking until the beef is fully browned and the onion is soft and translucent, another 3 to 4 minutes. Drain excess grease.
- Sprinkle taco seasoning over the beef. Stir well to coat every bit of meat.
- Push the beef to the edges of the skillet to clear the center. Add the tomato paste to the center of the pan and cook 30 seconds until it darkens slightly and smells toasty. Stir the bloomed paste into the meat.
- Pour in the water. Stir and simmer 2 minutes until the sauce thickens and most of the liquid is absorbed.
- Spray two large baking sheets with avocado oil spray.
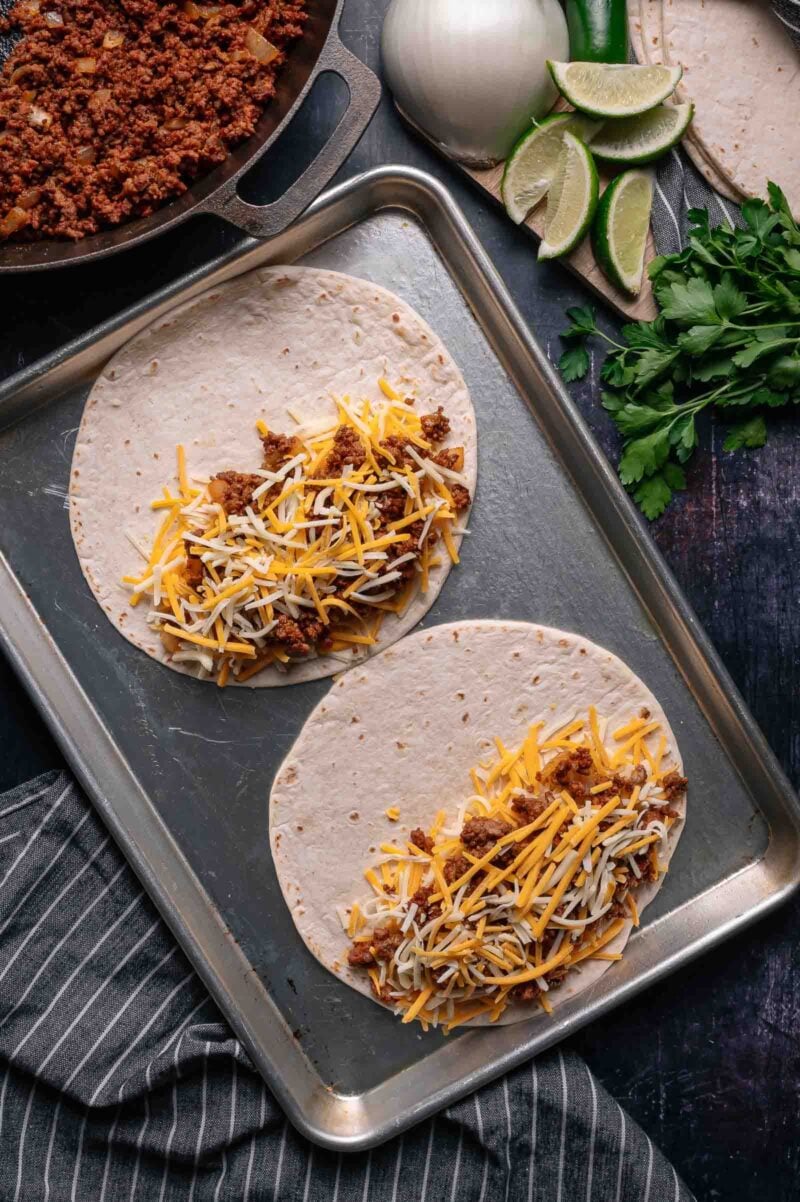
- Lay the flour tortillas flat in a single layer across the sheets without overlapping. Each tortilla needs its own space to crisp.
- Sprinkle a small layer of cheese directly onto each tortilla face. Spoon the beef over the cheese. Top with the remaining cheese.
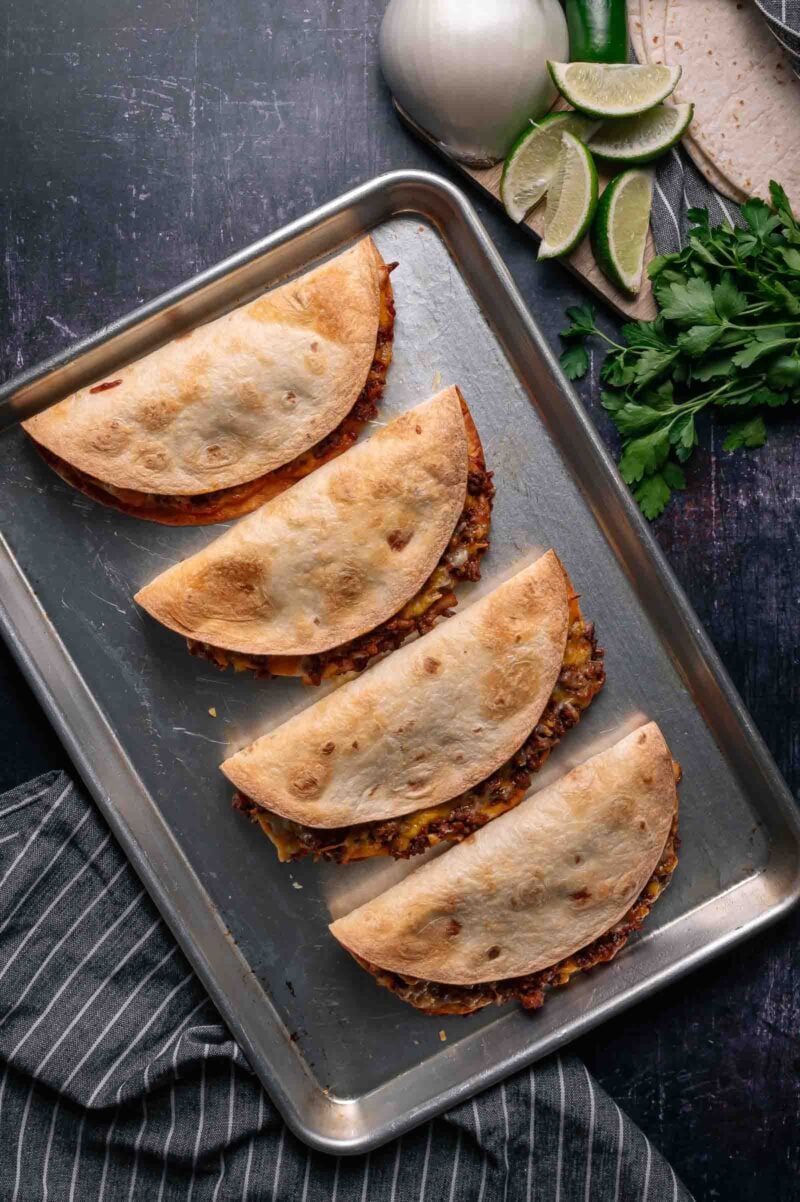
- Bake 12 to 15 minutes until the cheese is fully melted and the tortilla edges are golden brown. Watch the last 2 minutes closely.
- While the tacos bake, combine the sour cream, pickled jalapeño brine, and pickled jalapeños in a blender. Blend on high until smooth.
- Work quickly the moment the pan comes out of the oven. The cheese must still be molten to seal the taco. Fold each one in half and press gently with a spatula to set the shape.
- Drizzle the jalapeño cream over the tacos. Add shredded lettuce, diced tomato, cilantro, fresh jalapeño slices, and pickled red onions. Serve immediately with lime wedges.
🔄 Substitutions
- Ground turkey or chicken instead of beef: leaner and milder flavor. Turkey can still run wet (particularly the Costco ground turkey), so don’t skip draining. The filling will taste less rich, but the technique stays the same.
- Corn tortillas instead of flour: they crisp faster and more aggressively. Warm them first in the microwave wrapped in a damp paper towel so they’re pliable at fold time. They’re more likely to crack than flour.
- Sharp cheddar or Monterey Jack instead of Mexican blend: both work. Skip low-moisture mozzarella — it doesn’t brown the same way and doesn’t seal as well.
- Half an avocado blended into the jalapeño sour cream: makes the sauce thicker and tones down the heat if the brine runs spicy. Different texture but excellent.
- Chipotle peppers in adobo instead of pickled jalapeños: changes the sauce from bright and acidic to smoky and complex. Worth doing if you want something heavier.
💡 Meat Nerd Tips
- Bloom the tomato paste. Most taco recipes add the tomato paste to the water, and it tastes raw and flat. Thirty seconds in a dry center of the pan caramelizes the sugars in the paste, and the difference is real. This is the same principle as browning any tomato product before building a sauce.
- The assembly order is not optional. Cheese on the tortilla first, then beef, then cheese again. That bottom layer melts into the flour, creating a barrier. Skip it, and the filling migrates moisture into the shell before it has time to crisp. By the time you fold, you’ve got a soft taco. You made a soft taco when you wanted a crispy one.
- Fold immediately. The window is smaller than you’d think. The cheese sets hard as it cools. If you let the pan sit for more than 2 minutes after pulling it from the oven, the cheese becomes a solid that won’t bend with the tortilla, and you’ll crack the shell trying to close it. Have your spatula ready before the oven timer goes off.
- Give every tortilla its own space. Overlapping tortillas steam instead of being crisp. If your baking sheets are small, bake in two rounds rather than crowding everything onto one pan.
🍽️ What to Serve with Baked Crispy Beef Tacos
- Cilantro lime rice or Mexican rice on the side makes this a full plate instead of just tacos.
- Refried beans or seasoned black beans round it out without any extra effort.
- A cold beer or a margarita. That’s the correct pairing.
- If you want more taco options at the table, the grilled skirt steak tacos are what a taco spread looks like at its best. The street corn smash tacos also make a great addition if you want something the kids will love.
🧊 Leftovers and Storage
- These are best eaten immediately. The shell softens significantly as it sits.
- If storing: keep toppings separate and off the tacos entirely. Store assembled unfilled shells in an airtight container in the fridge for up to 2 days.
- Reheat on a wire rack at 350°F for 8 to 10 minutes to re-crisp the shell. The microwave makes them chewy and soft.
- The beef filling stores separately in the fridge for up to 3 days and reheats well in a skillet.
- The jalapeño sour cream keeps refrigerated in a sealed container for up to 5 days.
Have you tried this recipe? Do us a favor and rate the recipe card with the ⭐ ⭐ ⭐ ⭐ ⭐ and drop a comment to help out the next reader.
Baked Crispy Beef Tacos Recipe with Jalapeño Sour Cream

Ingredients
For the Beef Filling
- 1 pound ground beef 80/20
- 1/2 cup white onion diced
- 2 tablespoons tomato paste
- 1 packet taco seasoning
- 1/4 cup water
For Assembly
- avocado oil spray as needed
- 8 flour tortillas 8-inch
- 2 cups Mexican cheese blend shredded
For the Jalapeño Sour Cream
- 1/2 cup sour cream
- 2 tablespoons pickled jalapeño brine
- 1/4 cup pickled jalapeños
Optional Toppings
- shredded lettuce
- diced tomato
- fresh cilantro
- fresh jalapeño sliced
- pickled red onions
- lime wedges
Instructions
Brown the Beef
- Heat a large skillet over medium heat. Add ground beef and break into small crumbles. Cook until halfway browned, 4-5 minutes. Add the diced onion. Continue cooking until beef is fully browned and onion is soft, 3-4 more minutes. Drain excess grease.

Season the Filling
- Sprinkle taco seasoning over the beef and stir to coat. Push beef to the edges of the pan. Add tomato paste to the center and cook 30 seconds until it darkens. Stir into the beef. Pour in water and simmer 2 minutes until the sauce thickens.
Prep the Baking Sheets
- Preheat oven to 400°F. Spray two large baking sheets with avocado oil spray. Lay tortillas flat in a single layer without overlapping.
Assemble
- Sprinkle a small amount of cheese on each tortilla. Spoon beef over the cheese. Top with the remaining cheese.
Bake
- Bake 12-15 minutes until cheese is fully melted and tortilla edges are golden brown. Watch closely in the final 2 minutes.
Make the Sauce
- While tacos bake, blend sour cream, pickled jalapeño brine, and pickled jalapeños until smooth.
Fold and Serve
- Working immediately while cheese is still hot, fold each taco in half and press with a spatula to seal. Drizzle with jalapeño sour cream. Add toppings. Serve immediately.

Video
Notes
- Bake only what you plan to eat. These do not reheat well once folded and topped.
- Fold within 2 minutes of pulling from the oven. Cheese sets quickly as it cools.
- To reheat leftover shells: 350°F oven on a wire rack, 8-10 minutes.
- Jalapeño sour cream keeps refrigerated up to 5 days. Beef filling keeps up to 3 days.
Nutrition
Bookmark this recipe now!
Quick Summary
Baked crispy beef tacos get their structure from two layers of melted cheese: one on the bare tortilla before the beef goes on, one on top to seal when you fold. The 80/20 beef filling builds flavor with a bloomed tomato paste and taco seasoning. The pickled jalapeño brine sour cream is the thing that sets this version apart. Fold hot, serve immediately, eat all of them.
❓ FAQs
Yes, with a caveat. Corn tortillas crisp more aggressively and get closer to a hard shell texture. They’re also more likely to crack at the fold. Warm them in a damp paper towel in the microwave for 30 to 45 seconds first so they’re pliable. Work faster at the fold step than you would with flour.
The flat-open method lets you load the filling evenly without it overflowing, and it lets the cheese melt completely before the fold. When you fold first and then bake, the cheese can’t seal properly because the heat doesn’t reach between the layers as effectively. Flat baking also crisps the entire face of the tortilla, which gives you more crackling surface area per bite.
The beef filling can be made up to 3 days ahead and refrigerated. The jalapeño sour cream can be made up to 5 days ahead. The tacos themselves need to be baked and assembled right before serving. There’s no version of a baked crispy taco that holds well after it cools.
The packet delivers salt and spice. The tomato paste delivers umami — a concentrated savory depth that spice blends don’t have. When you bloom it in the pan, the sugars caramelize and the beef picks up a coating that’s noticeably more complex than seasoning alone. It’s a 30-second step that punches well above its weight.


My family loved it! I added some lettuce and diced veggies at the fold but otherwise followed the directions implicitly. The three of us required three baking pans for six 8″ tortillas and baked them for 12 or 13 minutes each.